
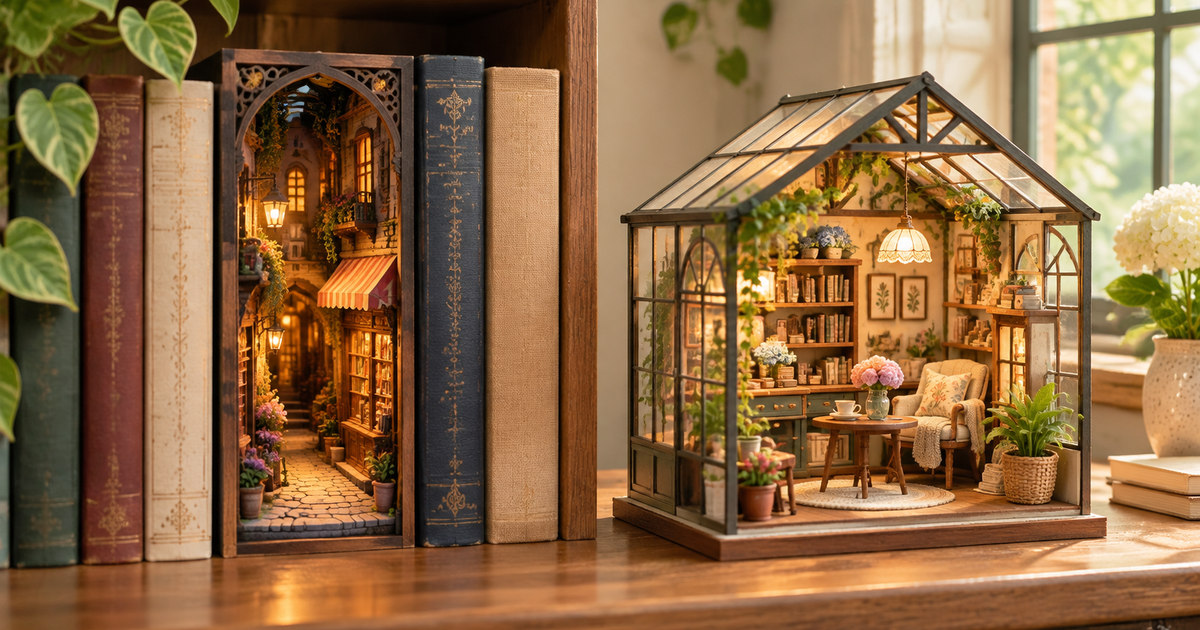
When comparing book nook kits vs miniature house kits, the most important difference is where the finished model is designed to live. The two can look almost identical in a product photo: tiny furniture, warm LED lights, shelves, plants and a little world built by hand. A book nook is a narrow, usually front-facing scene made to sit between books or on a bookshelf. A miniature house kit is generally a freestanding room, shop, greenhouse or home scene that you display on a desk, shelf or inside a case. If you want a compact bookshelf feature, choose a book nook. If you want a fuller scene with more room to furnish and view, choose a miniature house.
Affiliate disclosure: This article contains affiliate links. TestedWise may earn a commission if you purchase through them, at no additional cost to you. Read the full disclosure.
This guide is for adults and older teens in the United States who are choosing a first or next miniature craft project. It compares five identifiable Amazon US kits and explains how to plan the build. Product details come from manufacturer pages, instruction material and matching product records where available. The listed assembly times and difficulty levels are estimates, not results from a TestedWise hands-on build. Amazon listings, package versions and included accessories can change, so check the exact variation before ordering.
1. Book nook vs miniature house: the quick comparison
The two formats share materials and techniques, but they solve different display problems. A book nook is designed around a narrow footprint and a view into a small scene. A miniature house is usually designed as a standalone object, so the builder has more freedom to create a room, shop, garden or whole little home without needing books around it.
| What to compare | Book nook kit | Miniature house kit |
|---|---|---|
| Finished format | A compact, often tall bookshelf insert or bookend-style scene | A freestanding room, shop, greenhouse, cabin or dollhouse-style structure |
| Where it is displayed | Between books, at the end of a shelf, or on a desk | On a desk, shelf, side table, cabinet or inside a display case |
| Typical viewing angle | Mostly from the front, sometimes with a side or open-back view | Often from the front and sides; some designs are open or transparent |
| Space to measure | Height, width, depth and the clearance between neighboring books | Full footprint, height, roof or overhang clearance, and access for dusting |
| Common visual focus | Bookshops, libraries, streets, fantasy passages and layered perspective | Furniture, room layouts, cafés, kitchens, gardens, greenhouses and home scenes |
| Assembly style | Pre-cut panels, layered scenery, small paper details, lighting and sometimes a dust cover | Structural panels, miniature furniture, décor, paper or fabric details, wiring and sometimes more hand-applied adhesive |
| Difficulty | Ranges from a short beginner build to a detailed project with wiring and tiny props | Ranges from modular snap-fit rooms to advanced builds with many decorative parts |
| Best reason to buy | You want a miniature scene that belongs on a bookcase | You want a little world that can stand alone as a display piece |
There is no universal winner for build time or difficulty. CUTEBEE lists its Owl Bookstore book nook at 139 pieces and an estimated 1.5–2 hours, while Tonecheer lists 286 pieces and 6–8 hours for its feature-rich Beast and Beauty nook. On the miniature-house side, Rolife lists its Flavory Cafe at 183 pieces and about six hours, and its A-Frame Cabin at 336 pieces and about seven hours. Those examples show why the exact model matters more than the label on the box.
2. What counts as a book nook or miniature house?
Book nook kits are built for a bookshelf gap
A book nook is a small diorama that sits between books or along a bookshelf. The scene is usually framed by side walls and a top or back panel, creating the impression of looking down a street, into a library, through a doorway or into a fantasy setting. Many kits add LED lighting to make the interior visible in a dim room. Some include a clear dust cover or a front door; others leave the scene open.
The narrow shape is part of the appeal, but it creates a practical constraint. A nook that is too deep may not sit comfortably between your books, and a tall model may not fit beneath a shelf above it. Some designs are intended to be used as a bookend or displayed on a desk rather than squeezed tightly between heavy books. Check the assembled dimensions and the manufacturer’s recommended placement before buying.
Miniature house kits are freestanding scenes
A miniature house kit typically builds into a small structure with a base and walls, often furnished as a room, shop, café, greenhouse or cabin. It may have open sides, clear panels, a roof that lifts off, or a more enclosed exterior. Because it is not defined by the width of a book, it can use a broader footprint and show more of the interior from different angles.
“Miniature house” does not always mean a traditional dollhouse. Some kits are decorative dioramas with fixed furniture and tiny accessories. They may not have the scale, access or durability needed for dolls or repeated play. If you want a model that can be furnished, rearranged or used with miniature figures, check the scale, room access and whether the furniture is fixed in place.
Miniature room kits and modular room kits sit between the two
Some brands sell single-room kits or modular room systems that connect several small scenes into a larger display. A modular room may use molded plastic parts and snap-together connections, while a traditional miniature house may use wooden sheets, paper details, wire and glue. These are different build experiences even if both end up looking like a tiny shop or bedroom.
Do not assume that every product with “miniature house” in its title is a traditional wooden dollhouse. Rolife, for example, separates Book Nook, DIY Miniature House and Super Creator formats, and notes that glue requirements can vary by model and version. Read the exact product page and instruction manual rather than relying on a broad category name.
3. Which DIY project fits the way you want to display it?
Choose a book nook if your bookshelf is part of the plan
A book nook makes the most sense when you already have a place for it. It can turn a plain row of books into a small scene, and the narrow shape is useful when desk space is limited. A reader may prefer a bookstore or library theme; a traveler may like a miniature street; a fantasy fan may want a castle passage or enchanted shop.
Before choosing a design, measure the actual shelf opening. Measure the usable height from the shelf surface to the underside of the shelf above it, the available depth, and the width of the gap you intend to use. Leave a little room to slide the model into position and reach its switch or battery compartment. If the nook has a door or dust cover, check whether it needs extra clearance to open.
Choose a miniature house if you want a standalone focal point
A freestanding miniature house is better when you want the finished model to be seen on its own. A greenhouse can sit beside real plants; a café can become a desk display; a cabin can be a small focal point on a side table. You can position it at an angle and see more of the sides, roof and interior than you normally would with a narrow bookshelf insert.
The trade-off is space. A miniature house can be wider or deeper than a book nook, and its details may be more exposed to dust. If the kit has open walls or delicate paper flowers, think about where it will sit and whether you need a display case. A clear cover is not always included, and a separate case must fit the assembled dimensions rather than the box dimensions.
Choose by the part of the build you will enjoy
Some builders like fitting a clean structural frame together. Others enjoy making tiny books, flowers, cups, food, signs or furniture. The product photographs rarely tell you how much of the work is structural assembly and how much is repetitive detail work. Look at the instruction preview or package list. A kit with many small paper accessories may take longer than a kit with a higher count of large press-fit pieces.
- You like neat, layered scenery: A book nook may suit you, especially if you enjoy arranging a view from front to back.
- You like decorating rooms: A miniature house or room kit gives you more furniture and interior details to assemble.
- You want an illuminated display: Either category can include LEDs. Check the battery type, switch location, wire routing and whether batteries are supplied.
- You dislike glue and messy detail work: Look for an explicitly labeled snap-fit or glue-free model. Do not assume all book nooks are glue-free or all houses require glue.
- You want to customize: A more open miniature house may offer easier access for changing wallpaper, colors or accessories. A tightly enclosed book nook can be harder to modify after the front or roof is installed.
4. Five book nook and miniature house kits to compare
The following five Amazon US examples were selected because they represent different build styles rather than five versions of the same scene. Two are bookshelf inserts and three are freestanding miniature houses. The “best for” labels describe the use case each model appears to fit; they are not claims from physical testing or a ranking of product quality.
Best for a shorter first book nook project
1. CUTEBEE Owl Bookstore DIY Book Nook Kit
The Owl Bookstore is a compact, vintage-style bookshelf scene with a literary theme. CUTEBEE lists 139 pieces, a 1.5–2-hour assembly estimate, a two-star difficulty level and an assembled size of approximately 17 × 10 × 11.5 cm. The manufacturer describes a touch-activated LED, an illustrated English instruction manual, paper accessories and a battery box with wiring.
Its appeal is the manageable scope. Compared with a large multi-level nook, this is a smaller project with a clearly defined storefront and interior. That makes it a sensible first book nook to consider if you want to learn how miniature panels, printed details and lighting fit together without committing to a long build. The product page also describes snap-style connections that reduce the amount of glue needed.
There is an important preparation detail: CUTEBEE says craft glue is required for some steps and lists two AAA batteries and craft glue as items to provide separately. In other words, “less glue” does not mean “no glue.” Keep a small precision applicator or toothpick nearby, and use only the amount the instructions call for. The listed assembly time is the brand’s estimate; a first-time builder may take longer while sorting parts and checking alignment.
Check CUTEBEE’s Owl Bookstore specifications and package notes.
Best for a feature-rich, storybook-style bookshelf display
2. Tonecheer Beast and Beauty Book Nook Kit
Beast and Beauty is a more elaborate book nook built around a fairy-tale castle scene. Tonecheer describes 286 precision pieces and an estimated six-to-eight-hour build. Its standout feature is not simply the castle setting: the kit combines a music box, dancing central figures, touch-activated LED lighting with two levels, and a dust cover for the finished display.
This is the more immersive choice if you want the finished model to do something. Light and movement add another layer to the scene, and the dust cover is useful for a detailed bookshelf display. The trade-off is that an interactive model brings more things to assemble and check. The figures, lighting and music mechanism need to be positioned correctly, and the wiring should be tested before the structure is closed up.
Tonecheer presents this as a challenging build for people who enjoy detailed miniature work. It is not the first choice for someone who wants a quick, low-effort craft. The brand’s product information says liquid glue and batteries are not included because of shipping restrictions; a related Tonecheer product page specifies three AA batteries, but you should confirm the exact requirement for the selected ASIN. There is also a version caveat: the brand’s newer feature description lists a dust cover, while its product page notes that an older version may still be in circulation. Check the package photos and included-components list rather than assuming every listing contains the same cover. The official description also notes that a magic-wand control option is available, so check whether that accessory is sold separately.
Read Tonecheer’s Beast and Beauty feature and build details.
Best for a compact freestanding café scene
3. Rowood NO.17 Café Miniature House Kit (DG162)
The NO.17 Café builds into a standalone miniature coffee shop rather than a narrow shelf insert. Its product documentation identifies model DG162 and gives assembled dimensions of about 9.84 × 5.91 × 7.68 inches. Rolife’s matching Flavory Cafe DG162 product page lists 183 pieces, a three-star difficulty level and an estimated six-hour assembly time. The Rowood instruction material describes wooden structural pieces, miniature café accessories, LED wiring and a step-by-step manual.
This is a useful middle ground for someone who wants a proper room scene but does not want to start with the most intricate house in the list. The café theme gives the build a clear structure: counter, furniture, coffee equipment and decorative details. It is also a good example of why you should read the package list instead of assuming every tool must be bought separately. The manual lists sandpaper, tweezers, a screwdriver and a small amount of white craft glue as included, while scissors, a knife and diagonal pliers are recommended separately.
The lighting requires two AAA batteries, which the manual says are not included. Some pieces may need glue even though the structure uses slot-style connections. The manual also advises sorting parts by bag number and checking each piece against the diagrams. If you want a freestanding scene with a moderate amount of detail, this is a more approachable starting point than the advanced A-Frame Cabin or the larger greenhouse build.
Compare the manufacturer’s DG162 piece count and build estimate.
Best for a greenhouse theme and botanical detail
4. Rolife Cathy’s Flower House DIY Miniature Greenhouse (DG104)
Cathy’s Flower House is a freestanding greenhouse filled with miniature plants, flowers, shelves and gardening details. It is a good example of what a miniature house can offer that a narrow book nook often cannot: a scene that can be viewed from several sides, with transparent walls that make the interior part of the display. Rolife’s current DG104 product page lists 389 pieces, a four-star difficulty level, an estimated 7.5-hour assembly and a finished size of approximately 8.4 × 7.3 × 7.2 inches.
The plant theme is the main attraction, but it also explains why this is not automatically an easy first project. Small botanical pieces and transparent panels require careful placement. The clear walls make alignment visible, so rushed assembly or excess adhesive can be more noticeable than it would be on a closed model. The current manufacturer description says the updated version uses pre-colored components and a simplified structure; its lighting requires two AAA batteries.
Version warning: Cathy’s Flower House has been revised. Rolife’s own material distinguishes an older 231-piece version with an estimated 20-hour build from the current 389-piece version with an estimated 7.5-hour build. Amazon’s B07NZ2ZNVM listing may not make the revision obvious in every variation or product image. Before ordering, confirm the model number, piece count, package photos and current instruction version. Do not assume an older review or build video describes the exact kit being sold today.
See Rolife’s current Cathy’s Flower House DG104 specifications.
Best for an advanced cabin build with a standalone display
5. Rolife A-Frame Cabin DIY Miniature House (DG181)
The A-Frame Cabin is a detailed forest retreat with a distinctive roofline, interior furniture and small decorative elements. Rolife lists 336 pieces, a five-star difficulty level, an estimated seven-hour build and finished dimensions of approximately 9.68 × 8.74 × 8.58 inches. The instruction material describes an upgraded snap-fit structure that does not require glue for standard assembly, along with LED lighting that uses two AA batteries.
It is the most demanding miniature house in this shortlist by the manufacturer’s difficulty rating. The roof and interior layout create more alignment decisions than a simple one-room scene, and the many small details reward a patient builder. The finished cabin is a standalone display piece, so plan for a stable surface with enough clearance around the roof and sides.
This is not the model I would choose for someone who has never assembled a miniature kit and mainly wants to see whether they enjoy the hobby. It makes more sense if you have already built a small nook or room kit, are comfortable following a sequence of diagrams, or specifically want a more involved cabin project. Batteries are not included; check the exact Amazon listing and instruction sheet for the current package.
Review Rolife’s A-Frame Cabin piece count, difficulty and dimensions.
5. Difficulty, piece count and realistic build time
Product listings often make it tempting to compare kits by the number of pieces. That is only one clue. A 300-piece kit made from larger press-fit panels can be less fiddly than a 150-piece kit that asks you to fold tiny paper objects, thread wires through narrow channels or glue several small decorations in a precise order.
What makes a miniature kit difficult?
- Piece size: A large count of tiny pieces usually means more handling and more opportunities to misplace something. The size and shape of each piece matter as much as the total count.
- Paper and fabric work: Folding, trimming, wrapping or gluing miniature paper accessories takes patience. A scene with many tiny books, flowers or signs can be slow even if the main frame is simple.
- Wiring and lighting: LED strips, battery boxes, switches and moving parts add steps that need to be completed before the structure is closed. A wiring mistake can be difficult to reach later.
- Alignment: Walls, clear panels, roofs and layered scenery must meet at the right angle. A small error early in the build can make a later part appear crooked.
- Adhesive: Some kits are designed for snap-fit assembly; others need glue for furniture, paper details or structural joints. The exact model and version determine what is required.
- Access after assembly: A book nook may become harder to reach once its front frame or cover is installed. A miniature house with a removable roof or open walls may be easier to decorate, but that depends on the design.
Use the manufacturer’s time as a planning estimate
The assembly times in the product comparison are useful for understanding relative scope, not for scheduling a guaranteed finish. Manufacturers estimate under their own assumptions. A beginner may spend additional time checking the manual, sorting parts, removing pieces from sheets, testing the lights and correcting small alignment issues. A builder who has completed several kits may move faster, but may also choose to add paint, edge finishing or custom details.
For a first project, plan more than one sitting. Put the model away safely between sessions, keep the manual with the parts and label any loose wires or partially assembled sections. A few short, focused sessions are usually easier to manage than trying to finish a detailed kit in one long evening.
Why the easiest book nook is not always easier than a miniature house
The CUTEBEE Owl Bookstore is listed at 139 pieces and 1.5–2 hours, which is a relatively compact starting point. The Rowood NO.17 Café has 183 pieces and an estimated six-hour build, but its manual lists several helpful tools in the package. The Tonecheer Beast and Beauty nook has 286 pieces and moving features, while the A-Frame Cabin is rated five stars for difficulty. These are different projects, not a clean category-wide ranking.
If you are new, look for a clear difficulty rating, readable step-by-step diagrams, a modest parts count, a manageable finished size and a build method that matches your patience for glue and tiny accessories. Do not buy an advanced kit simply because its finished photo looks beautiful.
6. Tools, glue, batteries and materials to check
You do not need a full model-making workshop to build most miniature kits, but a few inexpensive tools can make the work more controlled. The exact list depends on the product. A kit may include tweezers and sandpaper but omit glue and batteries; another may include glue but expect you to supply scissors or a craft knife.
A practical starter tool kit
- Fine tweezers: Helpful for placing tiny paper pieces, flowers, labels, wires and small accessories.
- Small scissors: Useful for trimming paper, thread or decorative materials where the instructions call for it.
- Craft knife and cutting mat: Useful only when the manual requires clean trimming or careful removal. Use a sharp blade with controlled pressure, cut away from your hands and keep it stored safely.
- Small file or fine sandpaper: Helps smooth rough edges on some wooden parts. Sand lightly and check the fit before removing more material.
- Suitable craft glue: Prepare the adhesive specified by the manufacturer. A fine-tip bottle, toothpick or small applicator can help control the amount.
- Small trays or containers: Keep numbered parts, tiny accessories and screws from rolling off the table.
- Good task lighting: A bright desk lamp makes it easier to read diagrams and see small alignment marks.
- Correct batteries: Check whether the model needs AA, AAA or another power source, and whether batteries are included.
Glue required is not the same as glue included
This is one of the easiest details to miss. A manufacturer can require glue for assembly while leaving it out of the box because of shipping restrictions. A product can also use snap-fit connections for the main structure but still need a little adhesive for paper or decorative details. Read both the “glue required” and “what’s included” notes.
Requirements can even change between versions of the same model. Rolife’s guidance explains that some current Book Nook kits are marked as glue-free, while its DIY Miniature House category includes both glue-free and glue-required models. The company also notes that older and updated versions of a familiar design may use different assembly methods. The manual for the exact model you receive should take priority over an older review or a general brand assumption.
Check the lighting before you close the model
LED lighting is a major part of the appeal of many book nook and miniature house kits. Before you install a roof, front panel or dust cover, identify the battery box, switch, wire route and any touch sensor. Test the lights at the stage shown in the instructions. If a model has moving parts or a music box, test those mechanisms before closing the structure as well.
Do not assume the batteries are included. Check the type and quantity, confirm polarity and keep the battery compartment accessible after the build. If the finished model will sit between books, make sure the switch can still be reached without pulling the entire nook out of the shelf.
7. How to prepare for your first miniature kit
A little preparation prevents many avoidable mistakes. The goal is not to make the build faster; it is to avoid damaging a part or discovering too late that a wire, panel or accessory should have been installed earlier.
- Choose the display location first. Measure the shelf, desk or cabinet where the finished model will live. Compare those measurements with the assembled dimensions, not the shipping box. For a book nook, measure the shelf opening and check whether nearby books will press against it.
- Read the instructions once before removing parts. Look at the full sequence and note any steps involving wiring, lighting, moving parts, glue or parts that will become difficult to reach. Some builders in miniature-craft communities recommend looking a few steps ahead before permanently attaching a piece.
- Inventory and sort the components. Check the parts list, keep pieces grouped by sheet or bag number, and use small containers for loose accessories. If anything appears missing, recheck the packaging and the manual before contacting the seller or manufacturer.
- Prepare the tools and consumables. Confirm the correct glue, batteries, tweezers, scissors, file and cutting surface. Do not substitute a strong adhesive or solvent without checking that it is suitable for the kit’s wood, plastic, paper or acrylic parts.
- Dry-fit before gluing. Test the orientation of structural pieces and panels before applying adhesive. If a part does not fit, check the number and direction in the diagram. Do not force it into place; a reversed piece or an unfinished tab may be the real issue.
- Build the structure in the manual’s order. Keep walls, floors and roofs square. For a book nook, pay attention to the depth and layered perspective. For a miniature house, check that the base and walls are aligned before adding furniture.
- Install and test lighting at the correct stage. Route wires neatly and leave access to the battery box. Test LEDs, touch switches and moving mechanisms before enclosing the area.
- Add small decorations in batches. Assemble similar objects together, such as books, plants, cups or signs. Use tweezers for placement and a small applicator for adhesive. Allow glued parts to set before moving the model.
- Finish and protect the display. Remove loose dust and check that doors, covers and switches work. Place the finished model on a stable surface. If a dust cover is not included, measure a separate display case before buying one.
Community build discussions repeatedly mention a few practical habits: use tweezers, keep a small amount of suitable glue available, work slowly when removing wooden pieces from their frames, and check the instructions ahead before closing a section. These are individual builder experiences rather than guarantees about every kit, but they reinforce a useful rule: patience and preparation matter more than speed.
8. Common buying and assembly mistakes
Buying from the finished photo without checking the dimensions
A product photo can make a book nook look like a full-size book or a miniature house look much smaller than it is. Check the assembled height, width and depth. For a nook, check the shelf gap and whether the design is intended to sit between books. For a house, check the full footprint and the space needed to access its roof, doors or battery compartment.
Assuming every kit includes glue, batteries and tools
Package contents vary by model, version, seller and shipping route. A kit may include a battery box but no batteries, or require glue without supplying it. Some manuals list tweezers or sandpaper as included; others recommend a craft knife or scissors that are not in the box. Check the current package list rather than relying on a photo of a different version.
Using piece count as the only measure of difficulty
Piece count does not explain how many pieces are tiny, how much paper folding is involved, whether wires must pass through narrow spaces, or how many parts need glue. Read the manufacturer’s difficulty rating and assembly estimate, then inspect the instruction preview if one is available.
Closing the structure before testing the lights
LED wiring and battery access are much easier to troubleshoot while the model is still open. Test the light at the step recommended in the manual. If there is a touch switch, make sure the sensor can be reached through the intended panel. Do not bury a loose wire behind a wall or roof and hope it works later.
Applying too much glue or forcing a tight connection
More adhesive does not automatically create a better result. Excess glue can mark printed paper, cloud clear panels or leave visible residue. If a tab does not fit, check the orientation and part number. Sand only when the instructions or fit require it, and remove material gradually.
Confusing a decorative miniature with a playable dollhouse
Some kits are designed to be displayed, not handled like toys. Furniture may be fixed, doors may not open, and the scale may not match standard dollhouse figures. If you want to add figures or rearrange rooms, confirm scale and access before buying.
9. Pre-purchase checklist
Use this short checklist before ordering any book nook kit or miniature house kit. It covers the details most likely to affect whether the project fits your space, skill level and expectations.
- Format: Is it a bookshelf insert, bookend, freestanding house, single-room diorama or modular room?
- Finished dimensions: Will it fit the exact shelf or desk where you plan to display it?
- Difficulty: Is the manufacturer’s rating appropriate for your first or next build?
- Build estimate: Is the listed time realistic for the number of small details and your experience?
- Construction method: Snap-fit, press-fit, adhesive-backed, glue-required or a mixture?
- Package contents: Are the instruction manual, tweezers, sandpaper, glue, tools and dust cover included?
- Lighting: What battery type is required, how many batteries are needed, and where is the switch?
- Version: Is the listing showing the latest model revision or an older version with different parts and assembly steps?
- Age guidance: Does the manufacturer specify an age range, and are there small parts or sharp-tool steps?
- Support: Is there a parts list, replacement-parts process or assembly help if a piece is missing or damaged?
- Display care: Is a dust cover included, or will you need to source a case separately?
10. Which one should you choose?
If you are still deciding, use the final display and the kind of assembly you enjoy as your tie-breakers. The book nook is not automatically the beginner option, and the miniature house is not automatically the advanced option. A short book nook can be a quick first project, while an elaborate nook with moving figures and lighting can be a serious build. A miniature house can be a manageable café scene or a complex greenhouse with hundreds of small pieces.
| Your priority | Better starting point | What to look for |
|---|---|---|
| You love books and want a shelf feature | Book nook | Finished width and depth, shelf clearance, lighting and dust cover |
| You want a tiny room or shop on your desk | Miniature house | Footprint, viewing angles, furniture details and display case options |
| You are completely new to miniature building | Whichever has the lower difficulty and clearer instructions | Modest piece count, short build estimate, simple lighting and a clear parts list |
| You dislike glue and repetitive paper work | A verified snap-fit or modular kit | Exact model/version and explicit glue-required notes |
| You want lights, music or moving details | Either format | Battery type, wiring access, switch location and mechanism complexity |
| You want a more challenging weekend project | Advanced miniature house or feature-rich book nook | Manufacturer difficulty rating, part count, build sequence and support information |
| You are buying a gift | Choose by the recipient’s display space and theme | Age guidance, finished dimensions, skill level and whether extra supplies are needed |
For a shorter first book nook, the CUTEBEE Owl Bookstore is the most approachable example in this comparison based on its listed 139 pieces, two-star difficulty and 1.5–2-hour estimate. For a freestanding miniature scene, the Rowood NO.17 Café offers a defined room layout with a moderate manufacturer rating and a six-hour estimate. If you already enjoy detailed builds, Tonecheer Beast and Beauty, Cathy’s Flower House or the A-Frame Cabin offer more involved projects—but check the exact version, required supplies and display dimensions first.
If you enjoy small creative projects but want a different kind of hands-on craft, see our guides to beginner crochet kits and embroidery kits for adults. They use the same buying principle: choose a project with the right amount of guidance and materials for the way you want to learn.
Book nook and miniature house kit FAQs
What is the difference between a book nook kit and a miniature house kit?
A book nook is a compact diorama designed to sit between books or on a bookshelf. A miniature house kit usually builds into a freestanding room, shop, greenhouse, cabin or home scene for a desk or shelf. Both can use wood, paper, tiny furniture and LED lighting, but their finished shapes and display needs are different.
Are book nook kits easier than miniature house kits?
Not always. A small book nook with a low piece count may be a short first project, but a book nook with layered scenery, moving figures and lighting can be complex. Miniature house kits also range from simple modular rooms to advanced builds with many tiny decorations. Compare the exact model’s difficulty, assembly method and instructions.
Are miniature house kits good for beginners?
Yes, if you choose a model with a manageable difficulty rating, clear diagrams and a reasonable number of small parts. A compact café or single-room scene can be a better first project than a large greenhouse or highly detailed cabin. Check whether glue, batteries and basic tools are included before you begin.
Can a book nook be displayed on a desk instead of between books?
Many book nooks can be displayed on a desk, side table or shelf end, but the base and design should be stable in that position. Check the manufacturer’s placement guidance and assembled dimensions. Some designs are narrow and tall, so they may need support or a flat, protected location.
Can I put a miniature house kit between books?
Usually that is not the intended display format. A miniature house is often wider or deeper and may have exposed furniture, a roof or fragile details that can be pressed by neighboring books. If you want a shelf insert, choose a model specifically designed as a book nook or bookend.
How long does it take to build a book nook?
It depends on the model. CUTEBEE lists 1.5–2 hours for its Owl Bookstore, while Tonecheer lists 6–8 hours for Beast and Beauty. Those are manufacturer estimates, not guaranteed completion times. A first-time builder may need longer to sort parts, check diagrams and test the lighting.
How long does it take to build a miniature house kit?
Miniature house kit estimates vary by design and revision. The manufacturer lists about six hours for the Rowood/Rolife DG162 café, 7.5 hours for the current Cathy’s Flower House and seven hours for the A-Frame Cabin. Older versions of a model can have different piece counts and assembly times, so confirm the exact version.
Do book nook kits and miniature house kits come with glue?
Some do and some do not. A kit may require glue but omit it from the package because of shipping restrictions. Other models use snap-fit parts for the main structure but still need adhesive for paper or decorative details. Check the exact product page and instruction manual; do not assume all book nooks are glue-free or all miniature houses need glue.
Are batteries included with LED book nook kits?
Not necessarily. Many kits include the LED components and battery box but require you to supply the batteries. Check the battery type and quantity before ordering. Test the lights at the stage shown in the manual, before closing the structure or making the battery compartment difficult to reach.
What tools do I need for a miniature house kit?
Start with good lighting, fine tweezers, small scissors, a parts tray and the adhesive specified by the manufacturer. Depending on the model, you may also need a craft knife, cutting mat, small file or sandpaper, clips and batteries. Check the package list first because some kits include tweezers, glue or sandpaper while others do not.
Are book nook kits suitable for children?
Follow the manufacturer’s age guidance for the exact kit. Many adult-oriented miniature kits contain small pieces, wires, batteries, glue or sharp-tool steps. A child may need close adult supervision, and a kit marked for ages 14 or older should not be treated as a general toy for younger children.
What should I do if a miniature kit is missing a piece?
Before contacting support, check the parts list, bags, cardboard or wooden frames, and any small paper sheets. Keep the packaging and take a photo of the missing part number from the manual. Then contact the seller or manufacturer through the support channel listed for that product. Do not substitute a structural piece until you know whether a replacement is available.
Do book nooks need a dust cover?
A dust cover is useful but not universal. Some kits include a clear cover or door; others are open and need regular gentle dusting. If you plan to buy a separate display case, measure the finished model and check that the case leaves room for the battery switch, wires and any opening parts.
Can I customize a book nook or miniature house kit?
Many builders customize colors, wallpaper, lighting, signs, small accessories and display settings. The amount of freedom depends on how enclosed the model is and whether the parts are fixed. Make optional changes only after understanding the original assembly sequence, and test paint or adhesive on a spare piece before using it on a visible surface.
The right kit is the one you will enjoy building and have a sensible place to display. Choose a book nook for a compact bookshelf scene; choose a miniature house for a freestanding little world. Then check the exact model’s dimensions, construction method, difficulty, glue and battery requirements before you buy. A thoughtful first choice makes the small details feel like the fun part of the project—not a surprise you discover halfway through.