
A file can download successfully and still be the wrong file for your project. An SVG may contain cut paths when you expected a fold line; a PNG may be a full-color printable rather than a cut-ready design; and a font is not the same thing as a finished SVG. This guide explains what each format does and gives you a practical checklist before you spend time or material in Cricut Design Space.
SVG, PNG, DXF, and fonts: what is the difference?
| File type | What it contains | Best use | What to watch for |
|---|---|---|---|
| SVG | Scalable vector paths, often with separate layers | Cut shapes, lettering converted to outlines, layered paper or vinyl designs | Complex paths, tiny cutouts, missing fonts, incorrect cut/score operations |
| PNG | Pixel-based raster image; may have transparency | Full-color artwork, Print Then Cut, or print workflows | Pixel dimensions, background, print size, and whether it is actually a cut file |
| DXF | Vector drawing exchange format | Compatible desktop cutting workflows | Cricut does not support DXF uploads in its iOS or Android apps |
| OTF / TTF font | Typeface installed on a device | Creating editable words, names, and phrases | Glyph coverage, licensing, installation, and whether the recipient has the font |
Cricut classifies PNG and other common image formats as raster uploads, while SVG and DXF are vector uploads. A layered vector file can appear grouped on the Canvas, with its layers available after ungrouping. Cricut currently documents a 5,000-path limit for SVG uploads; a file with more paths can trigger an upload error. See the official upload instructions for the current workflow.
Single-layer or layered SVG: which is easier?
A single-layer SVG is usually the simplest place to start. It may be one solid shape or one phrase cut from one material. There are fewer pieces to weed, fewer alignment decisions, and less chance of placing a layer slightly out of position.
A layered SVG is useful when the finished design needs different colors, depth, or separate components. But layer count is not a quality score. A file with many tiny pieces can be harder to assemble than a simple one-color design. Check whether the layers represent meaningful parts, whether the colors need precise alignment, and whether the designer includes an assembly guide.
Three real file examples—and why they are not interchangeable
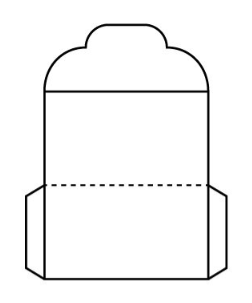
Vector template · paper craft
Envelope Template
The linked Creative Fabrica listing identifies SVG, transparent PNG, EPS, and DXF formats. For a paper envelope, the SVG is the useful starting point because it carries the vector outline. The preview also shows a dashed fold guide. After importing, inspect the Layers panel: a dashed line that is meant to fold the paper should not be sent to the blade as an ordinary cut.
Before cutting: Set the envelope to the finished dimensions you need, confirm the fold guide is assigned to Score or Draw as appropriate, and make a test from scrap cardstock. Do not assume the file is correctly configured just because it opens.
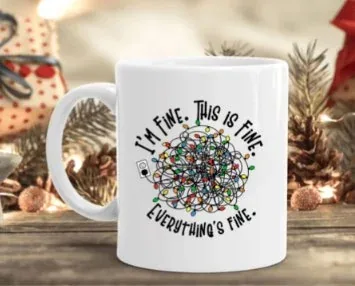
Transparent PNG · full-color artwork
Funny Christmas Sublimation PNG
This listing describes a transparent 300-DPI PNG and explicitly says it is not an SVG cut file. That distinction matters. The artwork is intended for printing or sublimation-style projects; the product mockup on a mug does not mean the download contains vector cut paths for a vinyl wrap.
Before using it: Check the pixel dimensions, intended print size, background transparency, and blank compatibility. If you want to cut around a printed design with Cricut, use a supported Print Then Cut workflow. For true sublimation, you still need the right printer, ink, transfer paper, and a sublimation-ready blank.

Installed font · editable lettering
Thick Black Font
Thick Black is a font, not a finished cut-file bundle. The Creative Fabrica listing describes it as compatible with Cricut and Silhouette and notes PUA-encoded extra glyphs. A PUA character may not be available from a normal keyboard key, so preview the glyph set if you need alternate swashes or symbols.
Before sharing the project: Keep an editable copy of the wording, then convert or weld the final lettering to paths when you need the SVG to look the same on another computer. Check the font license before making products for sale or transferring the font file to a client.
Cut, score, draw, or print: check the operation
In Design Space, an operation tells the machine what to do with a layer. Cut removes material; Score creates fold guides; Draw uses a pen; and Print Then Cut sends a printable image through a printer before the machine cuts its outline. A vector file can import with all of its lines treated as cuts, even when some lines were intended as folds or drawing guides.
Use the Operation menu to assign the correct job to each layer. If a score or draw layer must stay aligned with a cut shape, use Attach as needed. Cricut's current Selecting Operation guide explains the available operations and how to assign them.
How to check a PNG before printing
A “300 DPI” label does not tell you everything. Look at the actual pixel dimensions and calculate the size you want to print. For example, a 3,600-pixel-wide image printed at 12 inches gives 300 pixels per inch; printed at 18 inches, it gives 200 pixels per inch. The image may still look fine at a larger size, but fine details can soften as it is enlarged.
Also check whether the background is transparent or solid, whether white areas are part of the artwork or simply transparent space, and whether the colors suit the blank you plan to use. A transparent PNG is still a raster image; transparency does not turn it into vector cut paths.
Download checklist: five minutes before checkout
- Machine and device: confirm that the file type works with your Cricut model and whether you are using desktop or mobile.
- Included formats: read the exact list of SVG, PNG, DXF, EPS, PDF, OTF, or TTF files. Do not assume every design in a bundle has every format.
- Layers and operations: check whether colors are separated and whether any line is intended to score or draw rather than cut.
- Finished dimensions: compare the artwork with the real blank, including seams, handles, folds, and printable margins.
- License: confirm personal use, client work, physical products, print-on-demand, and digital end products separately.
Understand the Creative Fabrica license
The current Creative Fabrica subscription license is version 1.6, effective April 10, 2026. It allows certain physical and digital end products, but the conditions differ by asset category. For example, the rules for Fonts and Graphics after a subscription ends are not the same as the rules for Craft files. Digital end products must be flattened so customers cannot extract the original asset, and downloaded files cannot be redistributed. Read the full license for the exact item before selling a finished product.
Common Cricut upload problems
- “File too large” or too many paths: Cricut documents a 5,000-path SVG limit. Ask the designer for a simplified export rather than randomly deleting pieces.
- Pattern fills or gradients fail: Cricut lists pattern fills, gradients, textures, and embedded images among unsupported SVG/DXF elements. A raster export may be more appropriate for a full-color print workflow.
- Text changes on another computer: the SVG may rely on an installed font. Convert final lettering to outlines and keep an editable original separately.
- Fold lines cut through the project: review the operation assigned to each layer and change fold guides to Score or Draw when appropriate.
For full-color artwork, read Cricut's Print Then Cut guide. It explains how Flatten turns multiple objects into one printable layer and how the machine cuts the outside contour.
Frequently asked questions
Can Cricut Design Space open SVG files?
Yes. SVG is a supported vector upload format. The file still needs to stay within Cricut's path limit and avoid unsupported SVG elements.
Does PNG work with Cricut?
Yes, but PNG is raster artwork. It can be uploaded as a basic image or used in a Print Then Cut workflow; it does not behave like a vector SVG with editable cut paths.
Can I use DXF on my phone?
Cricut's current upload documentation says DXF uploads are not supported in Design Space for iOS or Android. Check the latest app guidance if your workflow is mobile-first.
Can I edit text inside an uploaded SVG?
Do not rely on it. Convert text to outlines before sharing a finished SVG, or add editable wording directly in Design Space. Keep a separate editable copy if you may need to revise it later.
Does a layered SVG always make a better project?
No. Layers are useful when the design needs separate colors or depth, but they add alignment and assembly steps. For a first project, a simple single-layer design is often easier.
Bottom line: Choose the file based on the job you need it to do. Confirm the format, inspect the layers and operations, size it for the real blank, and test it before committing your material.