
Visible mending for beginners starts with the fabric and the damage, not with a particular stitch or tool. It is a way of fixing clothing without pretending the damage never happened: a stitched patch on worn denim, a woven darn across a sweater hole, or a small motif covering a stain on fabric that is still sound. The best method depends on the garment. Sashiko is a natural fit for sturdy woven fabric, darning is usually the better answer for holes in knits, and a patch gives weakened cloth the extra support that thread alone cannot provide. This beginner's guide explains how to choose, what tools are worth buying, and how to make a first repair that stays comfortable and useful.
Affiliate disclosure: This article contains affiliate links. TestedWise may earn a commission if you purchase through them, at no additional cost to you. Read the full disclosure.
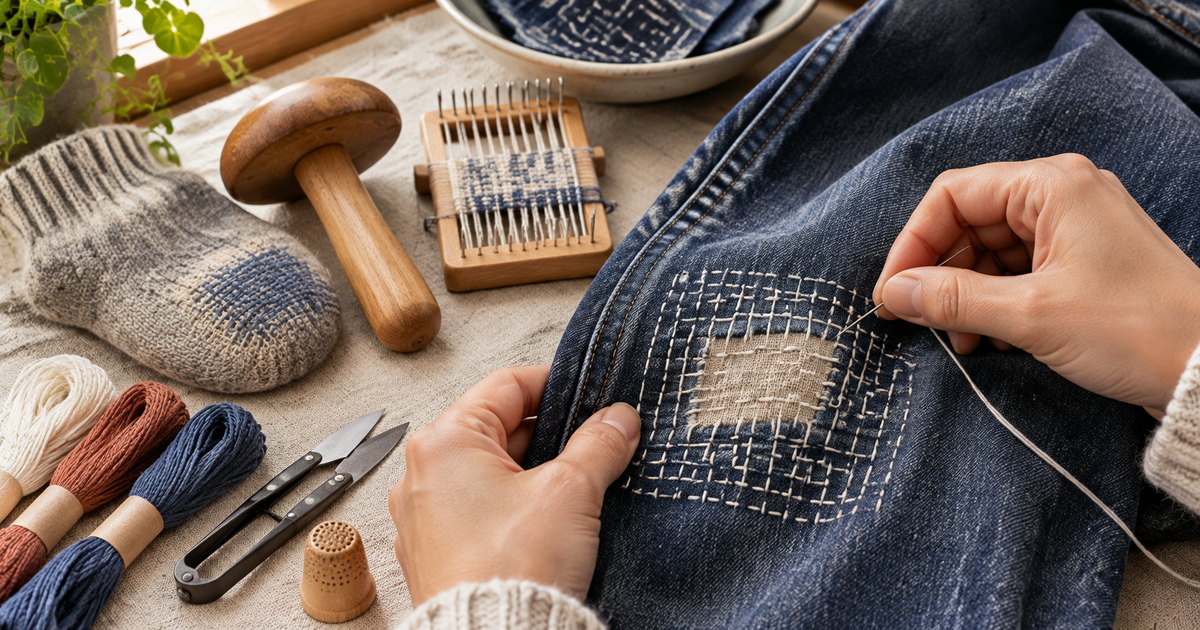
This guide is for beginners repairing everyday clothing at home. It covers hand techniques and small repair tools rather than sewing-machine alterations, tailoring or industrial textile restoration. Product details are based on exact Amazon US identifiers, manufacturer information and available retailer listings. TestedWise has not purchased or physically tested the products below. A product described as a kit may have multiple package variations, so check the selected Amazon option and its current contents before ordering.
1. Sashiko, darning and patching: the quick comparison
These methods can overlap, but they solve different problems. Sashiko uses repeated running stitches to reinforce or decorate a woven surface. Darning rebuilds a missing or thinning area with thread or yarn. Patching adds a piece of fabric behind or over the damaged area, giving the repair a new layer to hold onto. Embroidery can disguise a small stain or add detail, but it is not a substitute for structural reinforcement when the cloth is close to tearing.
| Method | Best starting point | What it does | What to watch |
|---|---|---|---|
| Sashiko | Sturdy woven cotton, denim, canvas or a reinforced patch | Uses rows or patterns of running stitches to hold layers together and reinforce a worn area | Dense stitching can make lightweight or stretchy fabric stiff; stabilize the weak area first |
| Hand darning | Small holes or thinning in socks, sweaters and other knits | Recreates a fabric-like structure by laying and interweaving thread or yarn across the gap | Match the fiber and weight where possible; overly tight stitches can pucker the knit |
| Mini-loom darning | Small, roughly bounded holes that suit the loom's working area | Holds warp threads on hooks so you can weave a small patch through them | It has a size limit and does not repair large tears or fabric that is failing well beyond the hole |
| Patch repair | Holes, tears or weak spots in woven fabric | Adds a separate piece of fabric to carry stress and cover the damaged area | Choose a patch with a compatible weight and enough overlap beyond the weak edge |
| Decorative embroidery | Small stains, snags or tiny holes in otherwise sound fabric | Adds a motif or stitched detail that makes a minor flaw less noticeable | Do not stitch a decorative flower over a large structural hole and expect it to hold |
A useful rule is to repair the fabric first and decorate second. If a knee is thinning across a wide area, a patch should carry the load; sashiko stitches can secure and embellish it. If a sock has lost yarn at the heel, darning rebuilds the missing knit. If a shirt has a tiny stain but the weave is strong, embroidery may be all that is needed.
2. Choose a repair by fabric and damage
Before choosing thread colors or a pattern, turn the garment inside out and inspect the damaged area in good light. Is there a clean hole, a thin patch of fabric, a split seam or a snag? Does the fabric stretch? Is the surrounding material still strong enough to hold stitches? A repair that looks tidy on the front can fail quickly if its stitches are anchored only to weak fibers.
Woven fabric: jeans, cotton shirts, canvas and linen
Woven fabric is made from crossing lengthwise and crosswise yarns. Denim, cotton shirting, canvas and many linen fabrics have a stable structure that can support hand stitching. If the fabric is thinning but has not yet opened, a patch behind the weak area plus rows of sashiko-style running stitch can reinforce it. If there is already a hole, trim only loose, damaged threads and place the patch far enough beyond the hole that the stitches land in sound cloth.
For jeans, choose a patch that is close to the denim's weight. A very heavy patch on lightweight denim can create a hard edge; a very thin patch under heavy denim may not add much support. A contrast color can make the repair intentional, but color does not compensate for a poor fit or insufficient overlap. Fashion Revolution's beginner denim guide recommends a patch that extends beyond the hole and uses fabric of a similar weight; its sashiko section also demonstrates working on a grid and stitching in both directions.
Knit fabric: socks, sweaters, cardigans and T-shirts
Knit fabric is built from loops, so it stretches and behaves differently from woven cloth. A small hole in a wool sock or sweater is usually a better candidate for darning than for a dense sashiko grid. Use yarn or mending thread that is close to the garment's fiber content and thickness. Wool on wool is a sensible starting point for a wool sweater; a smooth cotton embroidery thread may feel too firm and can cut across the softer knit loops.
For medium- or heavy-weight knitwear, woven darning can fill a hole with parallel threads and crossing rows. A blunt or ballpoint yarn needle helps move between knit loops instead of splitting them. For very fine knits, use a lighter method and finer yarn; a thick, raised surface darn may be uncomfortable or distort the fabric. Woolmark's sock-repair guide shows a simple running-stitch approach, while Patagonia and iFixit's woven-darning tutorial explains how to build a small woven patch on a knit garment.
Stretch jersey and activewear
Be cautious with dense, non-stretch thread on leggings, T-shirts, swimwear and activewear. A tight patch can stop the fabric from moving, creating a new tear around the repair. A small, compatible stretch patch or a machine repair with a suitable stretch stitch may be more practical. If the garment is expensive, technical or designed to perform under tension, check the manufacturer's repair advice before altering it.
Seams, hems and areas under heavy stress
A seam that has opened may need a backstitch or a seam repair rather than darning. A torn pocket corner, crotch seam or waistband is under repeated pulling, so a small decorative patch may not be enough. Reinforce beyond the visible opening and avoid placing a bulky knot where it will rub against skin. If the surrounding fabric has become thin in several directions, consider a larger patch or professional repair instead of trying to close the hole with a few tight stitches.
3. What sashiko is—and how it differs from boro
Sashiko is a Japanese stitching tradition built around running stitches. The Embroiderers' Guild of America traces the technique to Japan and describes its roots in extending the life of textiles, including reinforcing garments to make them thicker, warmer and more durable. The word is often translated as “little stabs.” White thread on indigo fabric is a familiar pairing, but it is not the only color combination or the whole story.
It is worth keeping sashiko and boro distinct. They are related, but they are not interchangeable names for the same thing. Sashiko refers to the stitching; boro refers to worn and repeatedly mended textiles and the patchwork process that builds new, reinforced cloth from remnants. Sashiko stitches may hold layers together on boro textiles, but not every sashiko project is boro and not every patchwork repair is sashiko. The EGA's historical overview is a useful starting point, and Japanese sashiko practitioners such as Atsushi and Keiko Futatsuya emphasize that the practice has cultural depth beyond a simplified decorative pattern.
For a beginner, the practical lesson is simple: learn the running stitch and how it reinforces fabric, but avoid presenting sashiko as a generic label for any visible white stitching. If you want to explore the tradition, use learning materials from Japanese practitioners as well as general embroidery guides. A practice sampler is a respectful place to learn the rhythm before adapting the technique to your own clothing.
Moyōzashi and hitomezashi in plain language
The EGA describes two broad sashiko styles. In moyōzashi, longer lines of running stitches form a repeating motif. In hitomezashi, smaller, denser stitches create a grid-like pattern. You do not need to memorize the names before your first repair. The distinction helps explain why some patterns are made from long continuous-looking lines while others build a dense surface from many short stitches.
For visible mending, begin with straight, evenly spaced rows. They are easier to mark, easier to control and useful for holding a patch in place. Move to a more complex pattern after you can keep the stitch length and spacing reasonably consistent. The goal is not machine-perfect uniformity; it is a repair with enough coverage, sound anchoring and comfortable flexibility.
4. The tools you actually need to start
A beginner can do a useful repair with a small sewing kit. Specialty tools make certain jobs easier, but they are not all mandatory. Buy for the repair you are about to make, not for an imagined future craft room.
Needles: choose for the thread and fabric
- Sashiko needle: longer than a standard embroidery needle, with an eye that can take thicker cotton thread. The length helps you load several stitches before pulling through.
- Embroidery or sharps needle: useful for ordinary hand sewing, patch edges and small decorative details on woven cloth.
- Tapestry or yarn needle: a larger eye and blunt point are useful when working with yarn on knitwear. A ballpoint needle can move between knit loops rather than splitting them.
- Needle threader: optional, but useful if your thread is thick or the eye is small.
Do not assume one needle will suit every repair. A long sashiko needle is designed for running stitches through woven fabric; a blunt yarn needle is more suitable for moving through knit loops. If you force a needle that is too thick through delicate cloth, you can enlarge the holes or damage the weave.
Thread and yarn: match the garment
Traditional sashiko thread is typically a thicker cotton thread with a soft, matte appearance. Olympus describes its standard sashiko thread as 100% cotton, approximately 20 meters per skein, and intended to be used without separating the strands. That is different from ordinary six-strand embroidery floss, which is designed to be divided into smaller strands. Follow the maker's instructions for the thread you buy rather than assuming all embroidery thread is prepared the same way.
For darning, match the fiber and weight to the garment where possible. Use wool yarn for a wool sweater, cotton thread or yarn for sturdy cotton fabric, and a compatible synthetic for some synthetic knits. As one example, DMC describes its Eco Vita 360 as a 100% organic wool crewel thread intended for mending and hand-washing at 30°C; that does not make it right for every sweater, but it shows why the thread’s fiber and care instructions matter. Matching is not only about color. A repair thread that is much stiffer or heavier than the original fabric can create a hard spot and transfer stress to the edge of the repair.
Fabric scraps and patches
Keep clean scraps from worn-out clothing, old pillowcases or fabric leftovers. A patch should be compatible with the garment in weight and behavior. Pre-wash a new cotton patch if it may shrink, and avoid a patch that is so thick it creates a ridge. For a woven hole, a patch that extends beyond the damaged area gives you sound fabric to stitch into. The exact overlap depends on the damage; a tiny hole in stable cloth needs less reinforcement than a wide, thinning knee.
Support tools: mushroom, egg, hoop or a folded towel
A darning mushroom or egg holds a sock or sleeve open and gives the fabric a curved surface to work over. It is particularly helpful on heels, toes and elbows. A tennis ball can work as a temporary support, as Woolmark notes, but a purpose-made mushroom gives you a handle and a more controlled working surface. For sashiko, you may not need a hoop at all; many stitchers work with the fabric supported in their hands. A small embroidery hoop can help with decorative embroidery, but do not stretch denim or knitwear so tightly that the repair changes shape.
Small extras that save time
- Sharp fabric scissors and small thread snips.
- Washable fabric chalk or a marking pen suitable for the fabric.
- A ruler for straight rows and a small square for patch placement.
- A thimble or palm thimble for pushing a long needle through several layers.
- Glass-headed pins or clips to hold a patch in place.
- A seam ripper for opening a seam when the garment construction blocks access to the repair.
Start with what is already in your sewing box. If you only want to mend one pair of jeans, you probably do not need a darning loom. If you are mainly repairing socks and sweaters, a mushroom and a blunt yarn needle will be more useful than a large collection of sashiko templates.
5. Five visible mending tools and kits to compare
The five products below cover different jobs rather than forming one required bundle. The first three support sashiko practice; the last two are for knitwear and loom-style darning. If you already own a suitable needle or thread, skip that item and put the money toward fabric scraps or a repair tool you will actually use.
| Product | Best fit | Listed strengths | Main trade-off |
|---|---|---|---|
| Verve Joy Sashiko Kit with Yokota materials | First guided sashiko project | Thread, sashiko needles, thimble and pre-printed Yume Fukin cotton cloth; English manual listed | A sampler teaches the stitch but is not a ready-made garment patch kit |
| Tulip Long Sashiko Needles, Tube of 6 | Needle upgrade for repeated running stitches | Six assorted lengths with large eyes; made in Japan | Needles only; thread and fabric are separate |
| Olympus Sashiko Thread, 4-Skein Bundle | Color variety for sashiko practice | Four 20 m skeins of 100% cotton thread | Designed for sashiko, not as a universal yarn for wool darning |
| The Quilted Bear Wooden Darning Mushroom | Hand darning socks and curved knit areas | Wooden mushroom head with a handle and curved support surface | It holds the fabric; you still need suitable yarn and a needle |
| Caydo Speedweve Darning Mini Loom Kit | Trying small woven repairs with a kit of accessories | Listing describes a 14-hook loom, mushroom support, 50 thread colors and assorted tools | Included floss is not automatically the right fiber for every garment; check the contents and match repair yarn separately |
1. Verve Joy Sashiko Kit with Yokota thread, needles and Yume Fukin cloth
Best for: a beginner who wants to learn sashiko with a guided practice piece rather than assemble every supply separately.
The listing for this kit identifies Yokota Co., Ltd. as the manufacturer and model 01-2180. Its listed components include sashiko thread, fine sashiko needles, a thimble and cotton “dream cloth” pieces known as Yume Fukin. An English manual is also named in the listing. That combination is useful because the first hurdle is often not the stitch itself; it is figuring out which needle, thread and fabric belong together.
Yume Fukin practice cloths are designed for sashiko and have pre-printed patterns that can be stitched over. DARUMA's own product information describes its Yume Fukin cloth as 100% cotton and says the printed guide marks wash away after stitching. Check that the selected kit variation includes the cloth and manual shown on the listing. This is a practice set, so do not expect it to include a denim patch or all the supplies needed for every type of clothing repair.
Check the Verve Joy Sashiko Kit on Amazon →
2. Tulip Long Sashiko Needles, Assorted Tube of 6
Best for: someone who already has fabric and thread but wants needles made for sashiko's longer running-stitch rhythm.
Tulip's official product information lists six assorted long needles: two at 66.7 mm, two at 44.5 mm and two at 51.5 mm. The needles have larger eyes for thicker thread and are made in Japan. The longest needle is useful for loading several stitches on a straight line; a shorter one can feel easier to control on a curve or a smaller repair. The range lets you find a length that suits your hand and the fabric rather than forcing every project onto one needle.
This is a focused tool purchase, not a starter kit. You will still need sashiko thread, fabric, scissors and a way to mark your lines. If you are only testing the craft, the Verve Joy kit above may be the simpler first buy. If you already know you enjoy sashiko, the Tulip assortment gives you more needle choices.
Check the Tulip Sashiko Needles on Amazon →
3. Olympus Sashiko Thread, 4-Skein Color Bundle
Best for: adding several cotton colors to an existing sashiko setup.
This bundle is listed as four 20-meter skeins of 100% cotton thread in colors #01, #10, #18 and #52. Olympus describes its standard sashiko thread as soft cotton for traditional stitching and lists a 20-meter length per skein. The thread is used as supplied rather than split into individual strands like ordinary embroidery floss. That gives you a clear, bold line for visible running stitches on woven cotton and denim.
Do not buy sashiko thread as a substitute for every mending yarn. It is a good match for sashiko on sturdy woven cloth, but it is not the default choice for darning a wool sweater. For knitwear, choose a yarn with a compatible fiber, thickness and amount of stretch. If you only need one color for a small first project, a multi-skein bundle may be more than you need.
Check the Olympus Sashiko Thread Bundle on Amazon →
4. The Quilted Bear Wooden Darning Mushroom
Best for: hand darning a sock heel, toe, sleeve or other curved knit area.
A darning mushroom slips inside the garment and gives you a firm, rounded surface to work against. The Quilted Bear's product description highlights its wooden head, handle and gradual curve. The handle helps you keep the support in position while you move the needle. It is a simple tool, but it solves a real annoyance: trying to darn a sock while the fabric collapses, twists or catches on whatever is underneath it.
The mushroom does not make the repair by itself. You still need a suitable yarn, a darning or yarn needle and scissors. It is also not essential for every repair; a tennis ball or your hand can support a sock in a pinch. Choose the mushroom if you expect to mend several pairs of socks or want a more controlled surface for repeated work.
Check the Wooden Darning Mushroom on Amazon →
5. Caydo Speedweve Darning Mini Loom Kit
Best for: a beginner who wants to experiment with small loom-woven patches and several accessories in one package.
The listing identifies this as a 54-piece kit with a 14-hook mini loom, a mushroom-style darning support, a weaving comb, 50 colors of thread, needles in several sizes, markers and a loom pick tool. That is a broad introduction to loom-style mending, and the small loom can make the over-under structure easier to understand than building every warp thread by hand.
There is an important material caveat. The thread assortment is described as embroidery floss, and some product records identify it as polyester. That is not automatically the right yarn for repairing a wool sock or sweater. Treat the included colors as practice and decoration supplies where they suit the garment; for a real knitwear repair, buy yarn that matches the garment's fiber and weight. Also confirm the selected variation and the exact package contents before ordering, since large multi-piece listings can change.
Check the Caydo Darning Loom Kit on Amazon →
6. How to make a first sashiko repair on denim
Start with a sturdy cotton tote, a denim scrap or a pair of jeans with a small thinning area—not a garment that is already close to splitting across a large section. Practicing on a scrap lets you learn the rhythm before you work around a knee, pocket or curved seam.
What you need
- A woven cotton or denim garment with a small weak area.
- A patch of similar or compatible weight, large enough to extend beyond the weak area.
- Sashiko thread and a long sashiko needle.
- Scissors, pins or clips, a ruler and washable fabric chalk.
- A thimble if you find it difficult to push the needle through the layers.
Step 1: assess the whole weak area
Look beyond the hole itself. If the fabric is thin across a palm-sized area, a patch should cover the thin section, not just the open center. Turn the garment inside out and check the reverse. Remove only loose threads that are already detached; do not trim away sound warp or weft yarns simply to make the hole look neat. If the damage reaches a seam or pocket edge, plan how you will reach the area with your hand and needle.
Step 2: prepare and position the patch
Cut a patch that extends beyond the damaged area into cloth that still feels strong. A few centimeters of overlap is a useful starting point for a jeans repair, but the size should follow the actual thinning, not a fixed number. Use a patch with similar weight and a compatible fiber. If it is new cotton, wash and dry it first so that later shrinkage does not pull the repair out of shape. Pin or baste the patch in place and smooth away wrinkles.
Step 3: mark a simple grid or parallel guide lines
For a first project, straight lines are easier than a complicated geometric motif. Use chalk and a ruler to mark lines in one direction, then add perpendicular guides if you want a grid. Fashion Revolution's beginner denim tutorial uses approximately one-centimeter guide lines as a practice starting point. You can make the spacing wider or narrower depending on the thread and fabric; consistency matters more than copying an exact measurement.
Step 4: prepare the thread and needle
Use a manageable length of sashiko thread so it does not tangle while you work. Thread the needle and make sure the thread passes through the eye without fraying. Sashiko thread is generally used as a single prepared strand rather than separated like six-strand embroidery floss; follow the thread maker's directions. A thimble can help when the needle passes through the patch and denim together.
Step 5: work the running stitches
Bring the needle through the fabric and load several small stitches along the needle before pulling it through. Keep the stitch length and the gaps between stitches reasonably even. Do not pull the thread so tightly that the denim gathers. Work along one guide line, then move to the next. If you are making a grid, the second direction will cross the first and help secure the layers. Take your time around seams and thick intersections; a needle can bend or become difficult to push through several layers.
Step 6: finish the thread without a bulky knot
Secure the thread on the reverse by weaving it back through several existing stitches or through the patch layers, leaving the finish flat. A large knot on the inside of a knee can rub against skin. If the thread runs out, start a new length in a sound area and secure it before continuing. Do not rely on a knot sitting directly at the hole's edge.
Step 7: check the repair before washing
Flex the garment gently and check whether the patch lies flat. The repair should not pull the fabric into a hard ridge or restrict movement. If you used a washable marking tool, follow its instructions and test on an inconspicuous area before washing the whole garment. Turn the item inside out and follow the garment's care label. Avoid assuming every marking pen or thread dye is colorfast.
A first sashiko repair does not need a complex pattern. A neat set of parallel rows that secures a patch is already a useful repair. Once you know how the needle moves through your fabric, you can experiment with staggered stitches, grids and repeating motifs.
7. How to darn a sock or sweater by hand
Darning fills or reinforces a hole by rebuilding the structure with thread or yarn. It is especially useful on knitwear, where a patch can feel bulky and a woven darn can preserve more of the garment's original flexibility. There are several forms of darning. A simple running-stitch darn can close a small sock hole; woven darning creates a small patch by crossing parallel threads; Swiss darning, also called duplicate stitch, follows existing knit stitches and is a different technique.
What you need
- A darning mushroom, darning egg, tennis ball or other smooth support that fits the garment.
- Yarn or mending thread that is compatible with the garment's fiber and thickness.
- A blunt or ballpoint yarn needle for knitwear.
- Small scissors and good light.
Step 1: support the damaged area
Turn the sock or sweater so you can work comfortably, then place the mushroom or egg inside the garment under the hole. The support should hold the fabric open without stretching it hard. If the area is curved, choose a support with a similar curve. Woolmark suggests a tennis ball or darning egg for socks; a mushroom is another reusable option that gives you a handle to control the working surface.
Step 2: inspect the edge and stabilize the weak zone
Remove loose lint and detached yarn ends, but do not cut away loops that are still attached. If the fabric is thinning around the hole, plan to carry the repair into the surrounding sound knit. A darn that stops exactly at the visible hole may leave the weakened edge unsupported. For a larger or irregular opening, mark a small working rectangle or oval that extends beyond the damage.
Step 3: choose the right yarn and needle
For a wool garment, use a yarn with a similar fiber content and weight if you can. A close color makes the repair less obvious; a contrast color makes it visible. A blunt or ballpoint needle is useful because it can pass between knit loops without splitting the yarn. Thread a manageable length—long enough to cover the repair, but short enough that it does not tangle or wear as you pull it through.
Step 4: lay the first set of threads across the hole
For a woven darn, create parallel rows that cross the damaged area and extend a little beyond it into sound fabric. Keep the spacing close to the width of the yarn. If the rows are too far apart, the patch will have gaps; if they are packed too tightly, the repair can become stiff. Keep the yarn relaxed rather than pulling it tight against the knit.
Step 5: weave the crossing rows
Turn the work and pass the yarn over and under the first set of threads, alternating the sequence on each row. This interlacing creates a small woven surface. Use the needle to guide the yarn between existing loops where possible, rather than splitting them. Keep the tension even. If the repair begins to pucker, ease the last row instead of pulling harder.
Step 6: secure the ends and test the stretch
Weave the ends into the back of the repair rather than leaving a large knot at the point where the sock touches your foot. Remove the support and gently stretch the fabric in the directions it normally moves. The repair should move with the knit, not form a rigid plate. If the hole is in a high-friction heel or toe, a wider reinforcement may last longer than a tiny decorative darn.
For a simple small sock hole, Woolmark demonstrates another beginner approach: place the sock over a support, sew running stitches around the edge and draw the opening together gradually. That method is easy to understand, but it is not the only kind of darning. If the surrounding knit is thin or the opening is larger, rebuilding the area with a woven darn can distribute the stress more evenly.
8. How a mini darning loom works
A mini darning loom is a small weaving tool, not a sewing machine. The hooks hold one set of threads in place while you pass another thread across them with a needle or pick. It can make a small rectangular or rounded woven patch more predictable, especially when you are new to weaving. Some kits combine the loom with a darning mushroom, colored thread and extra needles.
When a loom is useful
- You have a small hole or worn patch with enough sound fabric around it to anchor the weave.
- The repair area is within the loom's working dimensions.
- You want a visible woven patch and are comfortable following a repeated over-under sequence.
- You plan to make similar repairs often enough that setting up the loom is worthwhile.
When to use hand darning instead
A loom is not automatically faster for every hole. A curved sock heel, a tiny irregular snag or a repair close to a seam may be easier to work by hand. A loom also has a maximum working area; the DMC 14-hook mini loom, for example, specifies woven patches up to 5.5 cm wide by 4.5 cm tall. That is a product-specific limit, not a universal size for all looms. Large tears, broad areas of thinning or damage that reaches the seam may need a patch or a different repair method.
A simple loom workflow
- Read the instructions for the exact loom and confirm the garment can fit over or under its support plate.
- Position the loom so the damaged area is centered and the surrounding fabric is not stretched excessively.
- Set the warp threads across the opening using the hooks or elastic system supplied with the loom.
- Use the included needle or pick to pass the weft thread across the warp, changing the over-under sequence on each row.
- Keep the rows even and avoid pulling the yarn so tightly that the fabric gathers.
- Secure the ends according to the loom instructions, remove the tool and check the repair for loose edges.
Do not assume the thread included with a multi-piece loom kit is right for every garment. If you are repairing wool, use wool yarn of a suitable weight. If you are working on denim, a compatible cotton thread or yarn may be more appropriate. A colorful assortment is useful for experimenting, but fiber match and tension determine whether the repair feels good when worn.
9. Patching and decorative embroidery: when to use them
Use a patch when the cloth needs new strength
A patch is often the most reliable starting point for a hole in woven fabric. Cut away only loose, frayed fibers that prevent the patch from lying flat. Choose a patch that reaches beyond the weak edge into stronger cloth. Place it behind the garment for a discreet repair or on top for a more obvious design. Baste or pin it so it cannot shift, then stitch around the edge and through the patch as needed. A visible running stitch or sashiko pattern can secure the layers and make the repair part of the design.
For jeans, the patch fabric should be close enough in weight that it does not create a stiff lump. A cotton scrap from another worn garment can work well. If the jeans are very thick, use a thimble and take smaller bites rather than forcing the needle through several layers at once. If the hole is close to a side seam, opening part of the seam may make the repair easier, but re-sew it securely when finished.
Use embroidery for small flaws on sound fabric
A tiny stain, a snag or a pinhole in otherwise strong cloth may be a good candidate for a small embroidered motif. A leaf, star or simple cluster of running stitches can draw the eye away from the flaw. First check the back of the fabric and make sure the area is not thinning. If the hole is structural, add a patch or stabilizing layer before decorating it. Embroidery is the visible finish, not necessarily the reinforcement underneath.
Use a small backing layer when the fabric is delicate
Fine cotton, lightweight linen and thin shirt fabric can distort if you pull a heavy thread through them repeatedly. A lightweight backing patch or suitable stabilizer can spread the load. Test the combination on a scrap first. Avoid adding a thick, stiff layer to fabric that needs to drape, and follow the manufacturer's directions if you use fusible interfacing. Heat can damage some synthetics, coatings and delicate fibers.
Do not repair every garment the same way
A hole in a favorite cotton shirt is different from a tear in a waterproof shell, a flame-resistant work garment or a climbing harness. Decorative hand stitching can alter stretch, coating, breathability or protective performance. For technical garments, use the manufacturer's repair service or instructions. If a repair affects safety, do not treat a visible patch as proof that the item is safe to use again.
10. Common mistakes, finishing and garment care
Pulling stitches too tight
Tight stitches look neat while the garment is flat, but they can draw the fabric into puckers and create a rigid spot. This is especially noticeable on denim knees, sweater elbows and socks. Keep enough ease for the fabric to move. If the repair gathers, remove a few stitches and reset the tension rather than trying to stretch the garment back into shape.
Using the wrong thread for the fabric
Thick cotton sashiko thread is excellent for visible running stitches on sturdy woven fabric, but it is not the default thread for a soft wool knit. Polyester embroidery floss can be useful for decoration or compatible repairs, but it may not behave like the garment's original yarn. Match fiber and weight where possible, and test the repair on a scrap or hidden area.
Stitching only into the damaged edge
The edge of a hole is often the weakest part of the garment. If every stitch bites only into frayed fibers, the repair can pull out. Extend the patch, darn or reinforcement beyond the visible damage into material that still has strength. For wide areas of thinning, reinforce the whole weak zone instead of focusing on the center opening.
Choosing a tool before choosing the repair
A darning mushroom is useful for socks, but it will not repair a split denim seam. A sashiko needle is made for long running stitches, not every kind of knitwear repair. A mini loom can produce a neat woven patch, but it is limited by its hooks and working dimensions. Decide what the garment needs first, then buy the tool that makes that repair easier.
Skipping the test on a scrap
Test the needle, thread, stitch spacing and marking tool on a scrap of similar fabric. Check whether the thread bleeds, whether the marker disappears as expected and whether the repair feels too stiff. If you are using a new patch fabric, wash it before sewing so shrinkage does not pull the repair later. These small checks are less frustrating than unpicking a finished garment.
Washing and storing a repaired garment
Follow the garment's care label and the care instructions for the thread or yarn. Turn a heavily stitched repair inside out before washing, use a gentle cycle when appropriate and avoid high heat unless the garment label allows it. Air-drying is a cautious option for a repair you are still evaluating. After the first wash, inspect the patch edges, thread ends and any areas that flex heavily. A repair may need a few extra stitches after it has been worn and washed.
11. Visible mending buying checklist
Use this list before you order a kit or tool. It helps separate what you need for the next repair from accessories that may stay in a drawer.
- I know whether the damaged garment is woven, knitted or stretchy jersey.
- I have chosen the repair method based on the damage, not only the look I want.
- The needle type suits the fabric and the thread or yarn.
- The thread or yarn is a compatible fiber and weight for the garment.
- A patch extends beyond the weak area and is not dramatically heavier than the original fabric.
- A sashiko kit includes practice fabric, thread and suitable needles if I want a guided first project.
- A darning mushroom or egg fits the curved area I plan to repair.
- A mini loom's working area is large enough for the hole I need to mend.
- I have scissors, a marking tool, pins or clips and a way to support the garment.
- I have checked the exact Amazon variation and current package contents.
- I have not mistaken decorative embroidery for structural reinforcement.
If you enjoy hand embroidery beyond repair work, our guide to beginner embroidery kits for adults compares stitch samplers and project sets. If you are exploring other textile crafts, see our beginner crochet kit guide for a different kind of hands-on project.
12. Visible mending FAQs
What is visible mending?
Visible mending is repairing clothing in a way that allows the repair to be seen rather than hiding it. It can include a contrasting patch, sashiko-style running stitches, a woven darn or a small embroidered motif. The technique should still suit the fabric and the damage; a decorative finish is not enough if the cloth needs structural support.
Is sashiko the same as boro?
No. They are related Japanese textile practices, but the terms describe different things. Sashiko refers to the stitching technique, while boro refers to worn and repeatedly mended textiles and patchwork made from reused fabric pieces. Sashiko stitches may hold layers of a boro textile together, but the words are not interchangeable.
Can beginners use sashiko to repair jeans?
Yes, especially on sturdy denim or a woven cotton patch. Practice the running stitch on a scrap first, reinforce the weak area with a patch if needed, and keep the stitch tension loose enough for the jeans to bend. A long sashiko needle and cotton sashiko thread make the process easier, but a simple hand-sewing needle and compatible thread can work for a small first repair.
What is the easiest visible mending project for a beginner?
A small patch on a cotton tote or a practice square is a good first project. It is flat, easy to reach and less frustrating than a curved knee or sock heel. Try a few rows of running stitch before you attempt a dense pattern. Once you can keep the fabric flat and the tension even, move to a garment you wear.
What is the difference between sashiko and darning?
Sashiko is a running-stitch technique often used to reinforce or decorate woven fabric. Darning rebuilds a missing or thinning area by laying and sometimes interweaving thread or yarn. Sashiko is commonly used on denim and sturdy cotton; darning is especially useful for socks, sweaters and other knitwear.
Can I use regular embroidery floss for sashiko?
You can practice running stitches with embroidery floss, but the result will look and behave differently from traditional sashiko thread. Standard six-strand floss is designed to be separated into strands; many sashiko threads are used as a prepared single thread and have a thicker, more matte appearance. Follow the manufacturer's instructions for the exact thread.
What fabric is best for learning sashiko?
Start with a stable, tightly woven cotton or a denim scrap. It is easier to mark and keeps the running stitches visible. A pre-printed Yume Fukin practice cloth can remove the need to draw your own pattern. Avoid stretchy jersey for a first sashiko exercise because it moves under the needle and can pucker if the stitches are too tight.
Do I need a special sashiko needle?
A sashiko needle is helpful because it is longer and has an eye suited to thicker thread. The length lets you load several stitches before pulling the needle through. A large-eye hand-sewing needle can work for a simple practice project, but a proper sashiko needle makes long rows easier to manage.
What thread should I use to darn wool socks?
Use a yarn or darning thread with a similar fiber content and thickness to the sock. For a wool sock, wool yarn is a sensible starting point. Choose a blunt or ballpoint yarn needle that can move between knit loops. Cotton sashiko thread is designed for woven stitching and may feel too stiff for a soft wool sock.
Do I need a darning mushroom?
No, but it makes sock and sleeve repairs easier by holding the fabric open over a curved surface. A tennis ball or your hand can support a simple repair. A wooden mushroom with a handle gives you more control and helps keep the needle from catching on the surface beneath the garment.
What is a Speedweve or mini darning loom?
It is a small tool that holds warp threads on hooks so you can weave another thread across them to make a patch. It can help with small, fairly regular holes in knitwear or woven cloth. Each loom has a working-size limit, so check the dimensions before buying and do not expect a mini loom to repair a large tear.
Can I use a darning loom on jeans?
Some small looms can be used on sturdy woven fabric, including denim, if the damaged area fits the tool and the surrounding fabric can hold the repair. A patch with hand stitching may be easier for a large knee hole or a tear close to a seam. Follow the loom's instructions and test the setup on a denim scrap first.
Should a visible repair match the garment or contrast with it?
Either can work. A close color match makes the repair quieter, while a contrast color makes it a deliberate design feature. Choose color after you have chosen the right fiber, weight and repair method. A beautiful color cannot make an unsuitable thread comfortable or durable.
How do I stop a patch from feeling stiff?
Use a patch with a compatible weight, avoid unnecessary layers and do not pull stitches tight. Keep the patch large enough to reach sound fabric, but do not add a heavy backing to a lightweight garment. Test the repair on a scrap and flex it before finishing. If the area needs to stretch, use a repair method that can move with it.
Can visible mending make a garment as strong as new?
Not always. A repair can extend the useful life of a garment, but the result depends on the fabric, the size and location of the damage, the method and how the item is worn. A small darn in a sock is different from a tear across a high-stress seam. If the garment has a safety function or the surrounding fabric is failing broadly, seek professional repair or replace it when necessary.
Bottom line: Start with the fabric, not the tool. Use sashiko and a compatible patch to reinforce sturdy woven cloth, use darning to rebuild holes in knitwear, and save decorative embroidery for flaws in fabric that is still strong. A needle, suitable thread, a scrap and a little patience are enough for a first repair. Add a mushroom, loom or specialist kit only when you know which job it will make easier.