
Fermentation Kits for Beginners: Jars, Weights & Airlocks
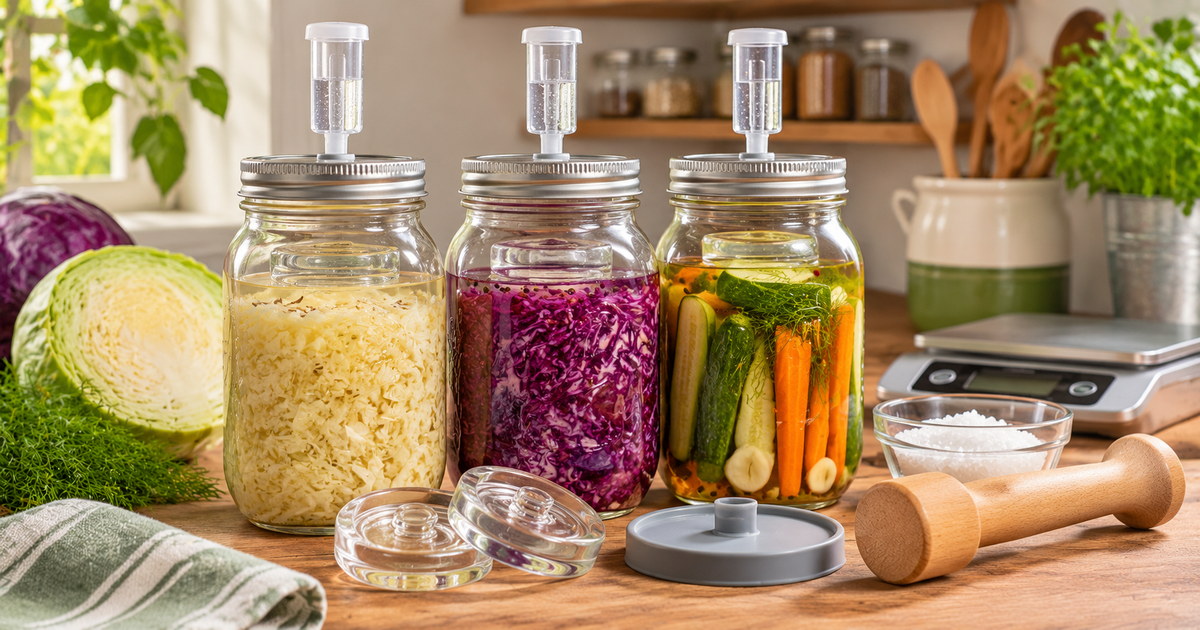
When comparing fermentation kits for beginners, start with the jobs each part must do—not the number of accessories in the box. For small batches of sauerkraut, kimchi-style vegetables, pickles and other lacto-fermented produce, the essentials are a food-safe jar, a weight that keeps the vegetables below the brine, and a lid or airlock that lets fermentation gas escape. This guide explains what each part does, how to choose the right jar size and mouth style, and which beginner-friendly kits and accessories are worth comparing before you buy.
Affiliate disclosure: This article contains affiliate links. TestedWise may earn a commission if you purchase through them, at no additional cost to you. Read the full disclosure.
1. Quick answer: what should a beginner buy?
For vegetable lacto-fermentation, think in terms of three jobs rather than a long shopping list. The jar holds the food; the weight keeps the food under the liquid; and the lid manages the gas produced during fermentation. A tamper, recipe booklet or extra jar can make the process easier, but those three functions are the foundation.
| Your situation | What to look for | Why it makes sense | What to double-check |
|---|---|---|---|
| First small batch | A single-jar starter kit | Jar, weight and airlock are matched in one package | Jar capacity, mouth size, recipe access and whether the jar is heat-safe |
| You own Mason jars | A multi-jar weight-and-airlock set | Equips several jars without buying more glass | Wide-mouth versus regular-mouth fit; screw bands may be separate |
| You only need an airlock | A compatible silicone valve or airlock lid | Useful when your jars already have suitable weights | Whether the package includes the lid, grommet or screw band |
| Your vegetables keep floating | Food-safe glass fermentation weights | Holds chopped or whole produce below the brine | Weight diameter, jar opening and whether one weight covers the batch |
| You need jars too | Wide-mouth, food-safe glass jars | Lets you build a system around common jar sizes | Actual mouth type, capacity, cracks and lid compatibility |
For most first-timers: a 24-ounce or quart-size wide-mouth jar is manageable for a small experiment, provided the recipe is written for that batch size and leaves the required headspace. If you already have several jars, buy compatible weights and airlocks instead of paying for glass you do not need. A larger jar is not automatically better: it needs enough produce to fill appropriately, enough headspace for activity, and a recipe scaled to its capacity.
2. What a vegetable fermentation kit should include
Shopping listings use “fermentation kit,” “fermenting kit,” “pickle kit” and “Mason jar fermentation kit” rather loosely. One package may be a complete one-jar setup. Another may contain only silicone airlock caps. A third may provide weights and lids for four jars but expect you to supply the jars and screw bands. Read the package list, not just the product title.
The jar: the fermentation vessel
For small home batches, a sound, food-safe glass Mason-style jar is a practical starting point. Glass is easy to inspect, does not absorb food odors in the way some materials can, and makes it easier to see whether vegetables remain under the brine. Choose a jar with an opening wide enough to load the vegetables and remove the weight without forcing either through the neck.
Check the jar for chips, cracks or damaged threads before using it. The lid system must match the jar's actual mouth: wide-mouth and regular-mouth Mason jars are different sizes, even when their listed capacities are identical. A lid that nearly fits is not a reliable fit.
The weight: keeps produce submerged
Vegetable pieces can float, especially when air is trapped between leaves or slices. A fermentation weight sits on top of the packed produce and helps hold it below the brine. That matters because exposed pieces have more contact with oxygen, which can encourage surface yeast and mold growth. The National Center for Home Food Preservation (NCHFP) says fermented cabbage and cucumbers should remain 1 to 2 inches below the brine during fermentation.
Glass weights are common in Mason jar kits. Many have a raised grip or a small handle so you can lift them out without digging around in the jar. The useful measurement is not just the weight's diameter; it also needs to pass through the jar opening and sit level on the food. A weight that is too small may let narrow strips or small pieces drift around its edge.
The lid and airlock: gives gas a way out
Lactic-acid fermentation produces carbon dioxide. A suitable airlock allows gas to escape while limiting the amount of outside air entering the jar. Some systems use a water-filled airlock with a small chamber; others use a waterless silicone valve, such as a one-way fermentation cap. Both are intended to manage gas, but the installation and maintenance differ.
An airlock is not a substitute for a weight. It manages the headspace above the brine; it does not push vegetables down into the liquid. Nor does an airlock turn an unsuitable recipe into a safe one. Follow the recipe and keep the produce submerged.
Other useful extras
- Screw band or retaining ring: Holds some silicone airlock caps in place. Check whether it is included; a number of accessory-only sets do not supply one.
- Vegetable tamper: Helps pack shredded cabbage and release its natural liquid for a dry-salted ferment such as sauerkraut. It is convenient, not essential for every recipe.
- Digital kitchen scale: Helps measure vegetables and salt accurately when the tested recipe uses weight-based quantities.
- Recipe instructions: More important than decorative extras. Look for a tested recipe with clear ingredient quantities, salt instructions, temperature guidance and storage directions.
- Tray or shallow plate: Useful under the jar if brine bubbles or overflows during active fermentation.
3. Five fermentation kits and supplies to compare
The five examples below cover different ways to start: a multi-jar accessory kit, a one-jar starter, separate airlocks, separate weights and jars. They are not five interchangeable all-in-one kits. Product specifications were checked against manufacturer pages and Amazon-linked product records where available. Some Amazon package details and variations can change, so confirm the selected listing before ordering. TestedWise has not physically tested these products or fermented food with them.
Best for equipping several jars you already own
1. Masontops Complete Mason Jar Fermentation Kit
The Masontops Complete kit is an accessory set for up to four jars. The manufacturer's current product information lists four Pickle Pebble glass weights, four Pickle Pipe silicone airlocks, one acacia-wood Pickle Packer tamper and a bonus recipe book. The airlocks use a one-way valve to release fermentation gas, while the weights help keep vegetables below the brine. The kit is available in wide-mouth and regular-mouth sizes, so choose the one that matches your jars.
The important catch: “complete” refers to the fermentation tools, not four glass jars. The manufacturer says the Pickle Pipes must be secured with a screw band, which is not included in this accessory kit; ordinary canning jars commonly come with bands. If you have no jars yet, add compatible jars and check that you have the required bands before starting.
- Good fit: A household that already owns several Mason jars and wants to ferment more than one small batch.
- Less suitable: Someone expecting a ready-to-fill package with jars included.
- Verify: Wide-mouth or regular-mouth selection, current package contents and whether you have four matching jars and bands.
Check the manufacturer's Complete Fermentation Kit contents.
Best simple starting point for one small batch
2. Masontops Single Jar Fermentation Starter Set
This is the more straightforward choice if you want to try fermentation without sourcing every component separately. Masontops lists a 24-ounce wide-mouth glass jar, one Pickle Pebble weight, one Pickle Pipe airlock and a plastic Tough Band to secure the cap. The product page also includes digital access to a recipe book. The compact size makes it easier to test a small batch before committing to several jars or a larger crock.
The 24-ounce capacity is a useful scale for a small household, but it is not a universal recipe size. Choose a tested recipe that can be scaled appropriately and leave the headspace it specifies. Masontops also states that this jar and band are not designed for boiling, canning or heat processing. Do not treat the fermentation jar as a canning jar for pressure or boiling-water processing.
- Good fit: A first-time fermenter who wants the jar, weight and airlock in one matched package.
- Less suitable: Large batches, several simultaneous ferments or recipes requiring a larger vessel.
- Verify: The Amazon variation, jar size and whether current instructions and recipe access are included.
Best if you already have jars and weights
3. Masontops Pickle Pipes Fermentation Airlocks
Pickle Pipes are a four-pack of waterless silicone airlocks. The one-way valve releases gas as fermentation progresses, so you do not have to open a jar just to release pressure. Masontops offers wide-mouth and regular-mouth versions. The company specifies BPA- and phthalate-free silicone and says the pipes are dishwasher-safe; it also recommends storing them flat so they do not warp.
This is an airlock-only purchase, not a complete kit. The product page says the pipes sit on the jar mouth and are secured with a screw band, which is not included. You still need a suitable jar and a weight. Before first use, the manufacturer instructs users to pinch the pipe to activate its one-way valve.
- Good fit: People who already have compatible wide-mouth or regular-mouth jars and weights.
- Less suitable: A first purchase if you do not own jars, weights or retaining bands.
- Verify: The mouth-size option and the exact number of caps in the selected Amazon listing.
Best standalone weight set to compare
4. SOLIGT 4-Pack Glass Fermentation Weights
This four-piece set is listed for wide-mouth Mason jars and uses a raised grip area intended to make each weight easier to lift out. The Amazon-linked product record lists approximate dimensions of 2.76 × 2.76 × 0.98 inches. That gives you a concrete measurement to compare with the inside of your jar, rather than relying on a vague “fits Mason jars” description.
It is a weights-only purchase. It does not replace the jar, lid or airlock, and the listing's stated material and fit claims should be checked against the exact item you receive. Glass weights need careful handling: inspect them for chips or cracks, avoid sudden temperature changes and follow the manufacturer's cleaning instructions. The Masontops care guidance, for example, warns against taking a hot glass weight straight into cold brine.
- Good fit: Someone with wide-mouth jars and compatible lids who needs weights for several batches.
- Less suitable: Regular-mouth jars or a setup with no gas-management lid.
- Verify: Actual weight diameter, jar opening, glass condition and cleaning instructions.
Review the Amazon-linked SOLIGT product record and listed dimensions.
Best base jars for a build-your-own setup
5. Ball 64-Ounce Wide-Mouth Mason Jars, Set of Two
If you prefer to assemble your own system, a pair of 64-ounce wide-mouth jars gives you two half-gallon-size glass vessels to work with. The Amazon-linked product record identifies the Ball set as two 64-ounce wide-mouth jars with lids and bands. The wide opening is convenient for packing vegetables, fitting a compatible weight and retrieving it after fermentation.
These are storage and canning-style jars, not a fermentation kit. The package does not supply a dedicated fermentation airlock or glass weight. You would need to add those separately, matching their size to the jar. Check the live listing carefully because marketplace bundles, pack counts and jar styles can change; do not assume every Ball jar with a similar capacity has the same mouth.
- Good fit: A DIY setup where you want two larger jars and will choose compatible weights and airlocks separately.
- Less suitable: Anyone who wants one ready-to-use kit with all fermentation accessories included.
- Verify: Two-jar pack count, 64-ounce capacity, wide-mouth opening and included lid/band configuration.
4. How to choose the right fermentation jar
Jar capacity is only half the decision. You also need a mouth opening that works with your hands, vegetables, weight and lid. A narrow-neck bottle can hold liquid, but it is awkward for packing cabbage, placing a glass weight and cleaning the inside. For a first vegetable ferment, a wide-mouth jar is often easier to work with.
Small jars: easier to manage, smaller batches
A 24-ounce jar is a sensible trial size if the kit includes a matched weight and airlock. It takes less counter space and lets you learn how your recipe behaves without preparing a large quantity of vegetables. The trade-off is that small jars can be less forgiving when the pieces are cut too large, the jar is packed unevenly or the recipe has not been scaled correctly. Use a recipe designed for the amount you are making, not a guess based on the jar's maximum volume.
Quart and half-gallon jars: more room, more produce
A quart jar is a common household size for small batches. A half-gallon jar gives you more volume, but it also needs more vegetables and a matching weight and airlock. The NCHFP's general container guidance uses roughly one gallon of container capacity for five pounds of fresh vegetables. That is a planning reference for the traditional vegetable-fermentation method, not a reason to fill every jar to the rim. Always follow the vessel size and headspace in the tested recipe you are using.
Wide mouth vs. regular mouth
Wide-mouth and regular-mouth jars use different lid diameters. A wide-mouth airlock cap will not become compatible with a regular-mouth jar just because the jar holds the same number of ounces. Masontops lists an outer mouth diameter of about 3.38 inches for wide-mouth jars and 2.75 inches for regular-mouth jars. The inside opening and the shape of the shoulder also matter when choosing a weight.
| Jar feature | What to check | Why it matters |
|---|---|---|
| Capacity | 24 oz, quart, half-gallon or another clearly stated volume | Choose a recipe and batch size that suit the vessel, with room for headspace |
| Mouth style | Wide mouth or regular mouth | Determines which airlock lids, bands and weights fit |
| Opening and shoulder | Can your hand and weight pass through easily? | A weight must be easy to insert, seat and remove |
| Glass condition | No chips, cracks or damaged threads | Damaged vessels are harder to clean and should not be used for fermentation |
| Included lid parts | Flat lid, screw band, silicone gasket or airlock | Some listings show a complete setup in photos but sell only the jar |
Do not use a decorative jar just because its opening looks large. Confirm that the vessel is intended for food contact and that its lid system is compatible. Avoid containers with cracks, scratched interior surfaces or uncertain food-contact materials. NCHFP recommends glass or food-grade plastic as suitable alternatives to traditional fermentation crocks; the University of Minnesota Extension also advises against metal containers that may react with the acid produced during fermentation.
5. Why fermentation weights matter
Keeping vegetables submerged is one of the most important jobs in a small-jar fermentation setup. Cabbage shreds, cucumber slices, garlic pieces and other produce can rise to the surface. If bits remain above the brine, they are exposed to more oxygen and are more likely to develop surface growth or spoilage.
A glass fermentation weight sits directly on the packed vegetables. It does not need to seal the jar or hold back gas; that is the lid's job. The NCHFP recommends keeping cabbage and cucumbers 1 to 2 inches below the brine. A weight is a simple way to help maintain that position in a Mason jar.
How to tell whether a weight fits
- It passes through the opening: The weight must fit through the mouth without scraping or wedging against the glass.
- It covers enough surface: A very small disc can leave a wide ring of vegetables floating around the edges.
- It sits level: A tilted weight can let pieces escape or rise around one side.
- It is easy to remove: A finger grip or handle is helpful once the vegetables are fermented and ready to transfer.
- It is intact: Do not use a chipped or cracked glass weight.
Glass, ceramic and improvised weights
Glass and food-safe ceramic weights are common choices. Some larger crocks use a plate and a separate weight; NCHFP describes a plate held below the brine by sealed jars or a sealed food-grade bag filled with brine. That is a different setup from a small Mason jar and should be used only as described in reliable instructions. Do not improvise with random stones, metal objects, non-food-safe plastic or anything that can shed material into the food.
Do not assume that every glass weight can be boiled or exposed to extreme temperature changes. Masontops specifically says its Pickle Pebbles are not intended for boiling or heat-processing and warns that moving a hot weight into cold brine can cause cracking. Wash and care for the exact product according to its instructions.
6. Airlock lids: what they do and what they do not do
An airlock manages the gas produced as fermentation proceeds. Carbon dioxide needs a route out of the jar. A properly fitted airlock is designed to let gas escape while limiting outside air entering through the lid. That is useful in a closed Mason jar, but the airlock does not control the salt level, correct an unsuitable recipe or keep floating vegetables under the brine.
Waterless silicone airlocks
Waterless silicone caps use a flexible one-way valve. Masontops Pickle Pipes are one example. They sit on the jar mouth and are secured with a compatible screw band. The manufacturer says the pipes are available for both wide-mouth and regular-mouth Mason jars, and that the valve should be pinched before first use to activate it. They are simple to store and do not require a water chamber to be filled and checked.
Check the small details: some packs include only the silicone caps, not the jars or bands. A product photo may show all three parts even when the listing sells only one component. The exact mouth-size selection matters.
Water-filled airlocks
A traditional water-filled airlock has a chamber that holds water. Gas bubbles through the water as it exits, while the water barrier helps limit air moving back into the vessel. It needs the correct lid, grommet or bung, and the water level must be maintained as the manufacturer's instructions specify. This style is common in brewing and some fermentation systems.
Do you absolutely need an airlock?
Not every traditional fermentation method uses a jar airlock. NCHFP describes crock-style methods that use a cover and weights, and Illinois Extension notes that fermentation can be done without a lock if vegetables remain submerged under the brine. For a beginner using a Mason jar, however, a matched airlock lid is a convenient way to manage gas and reduce repeated opening. Follow the method in the recipe rather than mixing parts of different systems.
Airlock is not the same as an airtight storage lid
A regular sealed lid can trap gas as fermentation becomes active. An airlock is designed to release that gas. Do not confuse a fermentation lid with a storage lid, and do not use a jar as a pressure vessel. Once the ferment is complete, follow the recipe's directions for cold storage or further processing. Do not leave an actively fermenting jar tightly sealed with a non-venting lid unless the tested method specifically instructs you to do so.
7. Buy a kit or build your own setup?
A kit is convenient because its parts are sold together, but it is not automatically the best value. If you already own jars, buying another jar-and-lid package may create duplicates. If you own no jars, a kit that includes a jar can save you from discovering that the airlock and weight you bought do not match the jar you later find in the cupboard.
| Approach | What you buy | Best reason to choose it | Main downside |
|---|---|---|---|
| Single-jar starter kit | Jar, weight, airlock and compatible band | One matched setup with fewer compatibility decisions | Limited capacity; may cost more per jar as you expand |
| Multi-jar accessory kit | Several weights, several airlocks and sometimes a tamper | Equips jars you already own | Jars and bands may not be included |
| Build your own | Jars, weights and lids purchased separately | Lets you choose the exact size and number of jars | You must check every compatibility detail yourself |
| Traditional crock setup | Food-safe crock, cover and appropriate weights | Useful for larger batches and traditional recipes | More space, more produce and a different cover/weight arrangement |
For a first attempt, the most useful purchase is often the one that removes the most uncertainty. A one-jar starter set is easy to understand. If you already have two or four wide-mouth jars, a compatible accessory kit may be more economical. For larger batches, compare the capacity of a crock with the quantity of vegetables your recipe requires rather than buying the biggest vessel on the shelf.
8. How to set up your first jar of fermented vegetables
The steps below describe the equipment sequence for a basic vegetable lacto-ferment. They are not a standalone recipe. Ingredient proportions, salt amounts, cut size, temperature and fermentation time vary by vegetable and method. Choose a tested recipe from a source such as the National Center for Home Food Preservation and follow it as written.
- Choose the recipe before the equipment. Check the recipe's batch size, vessel size, salt method, temperature range and expected fermentation time. Do not scale ingredients by eye.
- Inspect and clean the jar and tools. Check the jar, weight and lid for cracks, chips, damaged threads or residue. Wash food-contact surfaces with hot, soapy water and rinse thoroughly; follow any additional sanitation directions in the tested recipe and equipment instructions.
- Prepare fresh produce. Start with fresh, firm vegetables without signs of spoilage. Rinse under cool running water and prepare them as the recipe directs. Avoid substituting a different vegetable or cut size without a reliable recipe.
- Measure the salt accurately. Use the salt type and exact quantity specified by the recipe. A digital scale is useful when the recipe gives weights. Do not reduce the salt to make the ferment less salty.
- Pack the vegetables and add brine as directed. For a dry-salted recipe, massage or pack the vegetables as instructed so their liquid is released. For a wet-brined recipe, prepare the brine exactly as written. Do not assume the same salt-to-water ratio works for every vegetable.
- Place the weight. Set the correctly sized glass or ceramic weight on the vegetables. Check that the pieces remain under the brine and that the weight is not tilted.
- Fit the lid or airlock. Assemble the airlock exactly as its manufacturer instructs. Check that the lid, band, grommet and jar mouth are compatible. Leave the headspace required by the recipe.
- Ferment at the recipe's temperature. Keep the jar in the recommended location and range. Place it on a tray in case brine bubbles out. Do not rely on a generic time estimate from a product listing.
- Monitor the process without unnecessary opening. Look for the signs described in the recipe. Check that the vegetables remain submerged and that the airlock is correctly assembled. Do not repeatedly open the jar just to inspect it.
- Finish and store as directed. When the tested recipe's endpoint is reached, follow its instructions for refrigeration or further processing. Do not assume bubbling alone proves a batch is safe or finished.
9. Food safety: salt, cleanliness, temperature and spoilage
Fermentation is a food-preservation process, not simply vegetables left in a jar until they taste sour. Salt, acidity, temperature, oxygen exposure, ingredient condition and time all affect how the process develops. A well-designed kit can make the equipment easier to manage, but it cannot replace a tested recipe or safe handling.
Use a tested recipe and do not reduce the salt
Salt does more than season the vegetables. In fermented sauerkraut and brined pickles, it helps favor desirable fermentation organisms while inhibiting others and contributes to texture. The NCHFP specifically warns not to cut back on the salt required for fermented sauerkraut or brined pickles. Use canning or pickling salt as directed and measure the amount carefully.
Do not copy a generic “3 percent brine” or “5 percent brine” formula without checking what the percentage is based on and which vegetable and method it applies to. Some recipes calculate salt against the weight of the vegetables; others specify a brine made from a measured amount of water. Those are not interchangeable calculations. Follow the exact tested recipe rather than converting it from a social-media tip.
Keep equipment clean and use food-safe materials
Wash jars, weights, utensils, work surfaces and hands before starting. Use fresh produce and food-contact materials intended for fermentation. Avoid damaged containers and improvised materials of uncertain composition. The University of Minnesota Extension advises using glass, food-grade plastic or ceramic vessels and avoiding reactive metal containers. Keep the weight and vegetables under the brine rather than allowing exposed pieces to sit above the liquid.
Follow the recipe's temperature guidance
Temperature affects how quickly fermentation proceeds and the final texture. There is no single time or temperature that fits every vegetable and recipe. For example, NCHFP's sauerkraut guidance describes 70–75°F as a recommended range for its method and explains that cooler conditions take longer while warmer conditions can soften the kraut. That is a sauerkraut-specific reference, not a universal instruction for every ferment. Follow the temperature range for the recipe you selected.
Know when to discard a batch
Illinois Extension advises discarding fermented foods that become slimy or smell spoiled or rotten. It also explains that a white surface film that is not fuzzy or in round patches may be kahm yeast, which is common; that description should not be used to identify an unfamiliar growth by guesswork. If you confirm mold growth, discard the entire batch immediately rather than scraping the surface and tasting what remains. University of California Agriculture and Natural Resources identifies mold as a failed fermentation and notes that it can appear in several colors, including white. If the growth is unfamiliar, fuzzy or colored, the food smells putrid, the texture is slimy, the vessel is damaged, or you cannot confidently assess what you are seeing, do not taste it to find out. Clean the equipment before trying again. When in doubt, throw it out. See the UC ANR troubleshooting guide for fermented fruits and vegetables for mold examples.
Fermentation is not the same as canning
A jar used for fermenting vegetables is not automatically suitable for heat processing or shelf-stable canning. Some starter kits explicitly state that their jar, band or accessories are not designed for boiling or heat-processing. Do not process a fermentation kit in a boiling-water canner or pressure canner unless the vessel and tested canning recipe specifically allow it. Refrigerate finished ferments as directed by the recipe; do not assume they are shelf-stable because they taste acidic.
10. Common beginner problems and what to check
Vegetables keep floating above the brine
Check whether the weight is the correct size and sits level. Large leaves or long strips can fold around the edge of a small weight. Repack the vegetables as the recipe allows, use the correct weight and maintain the required brine coverage. Do not add a random object to force the food down.
The airlock does not bubble
Visible bubbling is not a complete safety test. Activity can vary with temperature, recipe, ingredients and the design of the airlock. First check that the lid and airlock are installed correctly and that the recipe's temperature conditions are being met. Follow the recipe's monitoring instructions; do not add extra salt, water or starter culture as a guess.
Brine bubbles out of the jar
Active fermentation can push liquid into the headspace and sometimes out through the airlock. A shallow tray under the jar helps protect the counter. Check that the jar was not packed above the recipe's fill line and that the required headspace was left. Do not seal an active jar with a non-venting lid to stop the overflow.
The brine looks cloudy
Cloudiness can have several causes, including ingredients, minerals in water or salt additives. Illinois Extension notes that some anti-caking additives can make brine cloudy and that iodized salt may slow fermentation or affect color. Cloudiness alone does not tell you whether a ferment is safe. Use the salt specified in the tested recipe and assess the batch using the full recipe guidance and spoilage signs, not appearance alone.
The glass weight is difficult to remove
Choose a weight with a grip or handle and confirm its diameter before buying. Do not lever it against the jar wall with a metal utensil. If a weight is wedged, work carefully and avoid striking the glass. Replace a chipped or cracked weight rather than continuing to use it.
For the next part of the decision, see the practical food-prep side of a camp kitchen.
A separate guide to outdoor food preparation is covered in a separate guide to outdoor food preparation.
11. Frequently asked questions
What is the best fermentation kit for a complete beginner?
A single-jar starter set is often the simplest first purchase because the jar, weight and airlock are designed to work together. A multi-jar accessory kit can be a better choice if you already own compatible Mason jars. Check exactly what is included before buying; some “complete” kits do not include jars.
Do I need a special jar to ferment vegetables?
No special branded jar is required for every method, but the vessel must be food-safe, clean, undamaged and appropriate for the recipe. Glass Mason-style jars are common for small batches. Make sure the mouth works with your weight and lid system.
Are wide-mouth Mason jars better for fermentation?
They are often easier to pack, clean and fit with weights because the opening is wider. The main requirement is compatibility: buy a wide-mouth airlock and weight for a wide-mouth jar, or regular-mouth parts for a regular-mouth jar.
Do fermentation kits include jars?
Some do and some do not. The Masontops Single Jar Fermentation Starter Set includes a 24-ounce jar, weight, airlock and band. The Masontops Complete multi-jar accessory kit lists four weights, four airlocks, a tamper and a recipe book, but not four jars. Read the package contents carefully.
Do I need a fermentation weight?
A weight is a practical way to keep vegetables submerged below the brine in a Mason jar. The NCHFP's guidance for fermented cabbage and cucumbers calls for the produce to remain 1 to 2 inches under the brine. Use a food-safe weight sized for your vessel and recipe.
Can I ferment vegetables without an airlock?
Some traditional methods use a covered crock and weights rather than a Mason jar airlock. Illinois Extension notes that fermentation can be done without a lock if the vegetables stay submerged under the brine. For a closed Mason jar, an appropriate airlock is a convenient way to manage carbon dioxide and reduce repeated opening.
What does an airlock do during fermentation?
An airlock provides a route for carbon dioxide to escape while limiting outside air entering the vessel. It does not keep vegetables submerged, set the salt concentration or prove that a batch is safe. Pair it with the correct weight and a tested recipe.
Can I use regular table salt for fermentation?
Use the salt named in the tested recipe, usually canning or pickling salt. NCHFP recommends canning or pickling salt and warns against reducing the salt in fermented sauerkraut and brined pickles. Additives and different salt densities can affect brine appearance and measurement.
How much salt should I use in a fermentation jar?
There is no single amount for every vegetable and method. A dry-salted sauerkraut recipe may calculate salt from the weight of the cabbage, while a wet-brine pickle recipe may specify salt per amount of water. Follow a tested recipe exactly and do not reduce the required salt.
How long does it take to ferment vegetables?
It depends on the vegetable, cut size, salt concentration, temperature and recipe. NCHFP's sauerkraut guidance gives different timelines for different temperature ranges. Do not rely on a generic number of days printed on a kit; use the recipe's process and endpoint instructions.
Why are my fermenting vegetables floating?
Vegetable pieces can trap air or rise as the jar fills. Use a correctly sized weight, pack the food as the recipe directs and maintain brine coverage. If the weight is too small or sits at an angle, pieces may float around its edge.
Is a white film on fermented vegetables mold?
Not always. Illinois Extension says a white film that is not fuzzy or in round patches may be kahm yeast, which is common. Do not guess if the growth is fuzzy, colored or unfamiliar. If the food is slimy or smells rotten, discard it; when in doubt, throw it out.
Can I use a fermentation kit for kombucha or sourdough?
This guide focuses on vegetable lacto-fermentation in jars. Kombucha uses a different vessel and process, while sourdough uses a starter culture and does not need a vegetable weight or airlock in the same way. Choose equipment designed for the specific fermentation method.
Can I reuse a fermentation jar for canning?
Only if the jar is specifically suitable for the canning method and recipe. Some fermentation starter jars and accessories are not designed for boiling or heat-processing. Follow the manufacturer's care instructions and a tested canning recipe; do not assume a fermentation kit is a canning kit.
Sources & further reading
- Amazon US — Masontops Complete Mason Jar Fermentation Kit, ASIN B01H7GI7V8
- Masontops — Complete Fermentation Kit for Vegetables: four weights, four airlocks, tamper and recipe book; jar and screw-band details
- Amazon US — Masontops Fermentation Jar Starter Set, ASIN B08ZPZ45L6
- Masontops — Single Jar Fermentation Kit: 24-ounce wide-mouth jar, weight, airlock and band
- Amazon US — Masontops Pickle Pipes Fermentation Airlocks, ASIN B01LWS63OF
- Masontops — Pickle Pipe Fermentation Airlocks: valve operation, mouth-size options and care
- Amazon US — SOLIGT 4-Pack Glass Fermentation Weights, ASIN B076V66FZ4
- Amazon-linked SOLIGT product record — four wide-mouth fermentation weights and listed dimensions
- SOLIGT — 4-Pack Fermentation Glass Weights: product description and material claims
- Amazon US — Ball 64-Ounce Wide-Mouth Mason Jars, Set of Two, ASIN B01N1SIQP2
- MerchantWords — Ball 64-ounce Wide-Mouth Jar, Set of Two: Amazon ASIN identity
- Retail product record — Ball 64-ounce wide-mouth Mason jar set, capacity and listed package details
- ASINsight — Amazon US Fermentation Kit market report, July 2026 (third-party market estimates)
- National Center for Home Food Preservation — Suitable Containers, Covers, and Weights for Fermenting Food
- National Center for Home Food Preservation — Sauerkraut recipe and temperature guidance
- National Center for Home Food Preservation — General Information on Fermenting: tested recipes and salt guidance
- University of Minnesota Extension — Preserving Food at Home: Fermentation
- University of Illinois Extension — Fermenting Vegetables: brining, submersion and spoilage prevention
- University of Illinois Extension — Fermenting FAQ: airlocks, spoiled ferments, containers and salt
- USDA National Institute of Food and Agriculture — Safely Fermenting Food at Home
- Virginia Cooperative Extension — Vegetable Fermentation: salt, brine and fermentation principles
- University of California Agriculture and Natural Resources — Preparing Fermented Fruits and Vegetables at Home
- Masontops — Pickle Pebble Fermentation Weights: jar sizing, food-contact material and care instructions
- UC ANR / UC Davis — Common Issues with Fermented Fruits and Vegetables: mold and failed fermentation
Content reviewed: Nov 19, 2026